Welcome to SourDom's beginners blog, the tutorials are:
How to make your own starter.
How to use short kneads to handle moist doughs and bake a loaf with a yeast-based preferment.
The subtleties of proving a loaf using a ‘biga’.
How to shape a loaf using a hybrid recipe.
The final crucial steps and putting it all together to bake a 100% sourdough loaf.
 What you will need:
- flour, water, dried yeast
- sharp knife
- tea towel or similar
- baking tray
Background
In this tutorial we are going to focus on the stages between kneading and baking, when the dough is allowed to rise. Although I would refer loosely to this whole process as ‘proving’, it is actually divided into two discrete stages - “bulk fermentation” (before the dough is shaped) and “proving” (after the dough is shaped).
I am going to summarise some of the issues, but it is hard to go past Jack Lang’s proving demo for an excellent demonstration of underproved, correctly proved, and overproved bread.
During the whole proving of the dough there are several things going on. The yeast are multiplying, feeding on the tiny amount of sugar that is present naturally in the flour, as well as on sugars that are generated from starch. Carbon dioxide is produced, and this will be filling up the tiny gas pockets generated during the kneading of the dough.
In the first half of proving bakers will sometimes ‘fold’ or ‘turn’ the dough in order to stretch out the air pockets as they expand. This improves the structure of the loaf, and gives the dough a bit more resilience to handling.
For sourdough loaves a lot of the sour flavour develops as a result of activity during proving, and manipulating the timing and temperature of proving can affect this substantially. By proving at a lower temperature it is possible to stretch out the whole process, which allows the flavour to build in the dough without the whole dough disintegrating. (If you leave a dough long enough the gluten will start to break down, and it will become sticky and gluey again).
With conventional yeast based recipes, the timing of proving will often be quite short - perhaps 30-60 minutes, whereas with sourdough we will usually have two periods of proving of perhaps 3 or 4 hours each. In this tutorial we will use a ‘biga’, which is a “starter” made using a tiny amount of yeast, allowed to ‘pre-ferment’ overnight. The timings with this sort of dough are somewhere in between a conventional loaf, and a true sourdough. (This is not proper sourdough, and again you can follow this tutorial using the sourdough version of the recipe if your starter is already active). We are also going to break up the proving with a session in the fridge half-way. The reason to do this is partly to develop flavour, but also (for the sake of the tutorial) to demonstrate how it works.
Instructions
For this tutorial we will use Pane Francese (3) - the ‘biga’ version.
For instructions about kneading see the last tutorial
Thursday evening: (for a Saturday bake)
Mix the yeast with the water (hand hot). Leave for 10 minutes. Add the flour, and stir with a spoon to mix well. It will form a fairly thick sticky dough. Cover the bowl with plastic wrap, and leave out (at room temperature) for 12-24 hours.
Friday 6pm (after work)
Mix the biga with the water (335g). Mix well, rubbing with your fingers to break down some of the lumps. Add the flours and salt. Mix it all together roughly with your fingers. Cover and leave for 10 minutes.
6:15
Put a generous teaspoon of oil onto a board or clean benchtop. Unearth your dough onto the surface and knead for just 10 seconds. Clean the bowl, return the dough to the clean (oiled) bowl and leave for 10 minutes
6:25
Knead for 10 seconds. Put back in the bowl, leave for 10 minutes.
6:35
Knead for 10 seconds. Put back in the bowl and leave for 3/4 hour.
Bulk Fermentation
7:20
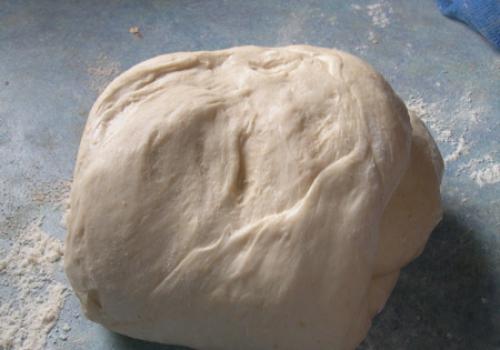
Gently lift the dough out of the bowl and place on a lightly floured surface.
With a sharp knife slash the top of the dough rapidly (perhaps a centimetre deep). Gently prize apart the sides of the cut, and have a look to see if there are bubbles visible along the cut surface of the dough. There should be a few, but not lots. (see below for an example of dough that has quite a lot of bubbles and is ready for shaping - but yours won’t be yet)
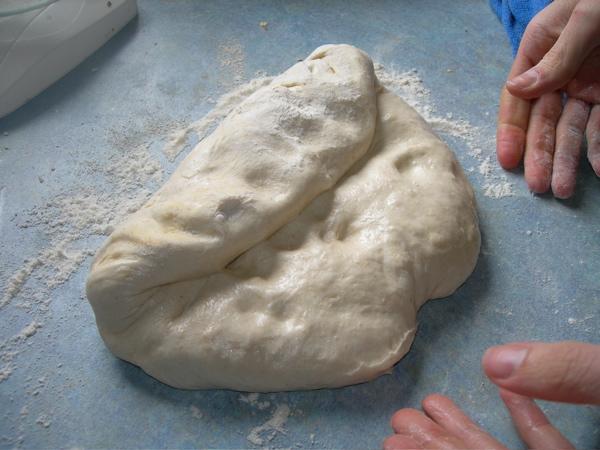
Now we are going to fold the dough. Dimple it into a rough circle with your fingertips (don’t push all the air out, we just want to roughly squash it a bit). Pick up the far side of the dough with your fingers, stretch it away from you then fold it back in on itself, leaving 1/3 of the dough exposed. (Look at
the photo - it makes more sense)

Now take hold of the near edge, stretch it towards you, and fold over the top of the 1st fold.

Take the right hand edge of the folded dough (the photo is take from the side, so it is the top of the photo) with your right hand. Stretch it out to the right, then fold it back in on itself (leaving 1/3 of the dough exposed).

Finally take hold of the left hand end of the dough, stretch it out, and fold it over the top.

OK, now flip the whole lot over so that the fold is on the bottom, put it back in the bowl, and leave it alone for 45 minutes.
8:10
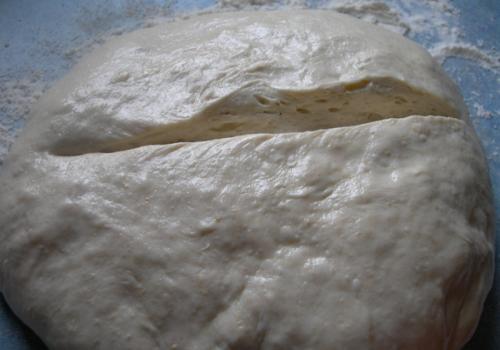
Gently scoop the dough out of the bowl and place on the lightly floured benchtop. Slash the top (as before) and inspect for bubbles.

Here you can see a lot of bubbles along the cut surface, so it is time to shape the dough, however if there aren’t a lot leave it for another 45 minutes and do the same thing again.
Shaping the dough: for the sake of this tutorial we are going to keep this pretty simple again. Dimple the dough with your fingertips. Grab hold of the far end and roll tightly up towards you. When it is all rolled up turn it so that the seam is facing up. If you need to pinch the edges of the seam together.
Flour liberally a tea towel (use rye flour if you have it, it will stick less). Place the ‘log’ in the middle of the tea towel. Fold the near and far edges of the tea towel over the dough, then twist and tuck in the sides.
Proving
Place the tea towel on a tray. Put the tray and dough inside a large plastic bag and tuck the end of the bag under the tray. Place the whole thing in the fridge and leave overnight.
Saturday 8am:
Take the dough out of the fridge. Have a peek in between the folds of the tea towel. Give the dough a poke with your finger. It will be quite cold and firm and the indentation that you made will be slow to fill. Leave for an hour.
9am:
Have another peek at your dough. Poke it (it won’t bite).
The dough will have warmed a bit and may have started to rise a little (it will depend on the temperature of your kitchen).
How long should you wait before baking? It is hard for me to answer that. This dough is likely to be ready to bake 1-2 hours after it has come out of the fridge (see below for more discussion about the fridge factor), but it will depend a lot on how warm the room is. Clues to a dough that is ready to prove are that
- It has risen by perhaps twice its volume
- It has lost some of its elasticity
The latter occurs as the gluten is stretched. You can see this in the ‘pushing back’ of the dough when you poke it. When you have first shaped the dough, and you poke it with a finger, the indentation that you made will disappear quite quickly. As the dough rises it will reach a point where it no longer pushes back quickly when you poke it. At this point the dough is fully proved, and leaving it longer will lead to the gluten being overstretched, and the dough collapsing when you try to move it.
In practice, it is hard to know just how much your dough has risen by looking at it. And the ‘poke with a finger’ test can be a bit subtle and hard to interpret (cold dough will be slower to push back). You will get a feel for when your dough is ready after a while. Often you only know whether you have picked the right moment after you have baked the loaf (when it is obviously too late!). In general it is better to err on the side of underproving (baking too soon).
Saturday 9.30 am (approx)
Bake at ~210C for approximately 45 mins

More Hints about proving:
Underproved/Overproved
Have a look at Jack Lang’s demonstration for the best explanation of this that I have seen.
In simple terms, if you bake too early, the air pockets in the dough have not expanded as much as they could, and the resulting loaf will be denser (especially towards the bottom of the loaf). The ‘oven spring’ (how much the loaf rises in the oven) may be more, but the overall loaf volume won’t be as great as a correctly proved loaf.
If you wait too long (overproved), the gluten will be overstretched, and the fragile pockets of air will collapse when you try to transfer the loaf in to the oven. THe loaf will end up ‘flatter’. It won’t rise so much in the oven, so your slashes won’t open up as much. The crust will also tend to be darker (due to more sugars in the crust).
Using the fridge
In the above recipe we used the fridge after bulk fermentation and shaping but before the second rise. Long proving at cool temperatures has a couple of advantages with sourdough, particularly in terms of the development of flavour in the dough, and flexibility with timing of baking. In a later tutorial we will cover a couple of different timetables for baking, but being able to use the fridge will let you mix the dough, and then bake in the evening after work, or mix one day, and bake the next.
When your dough is in the fridge yeast activity slows down, and there will tend to be minimal rising of the dough. However this varies a bit, depending on the activity of the yeast, and the starting temperature of the dough. For example with a very active starter (or with a commercial yeast based starter as in the recipe above) you would expect to see some rising of the dough in the fridge. If the dough is warm (at room temperature) to start with, it will take a couple of hours in the fridge before the whole dough has cooled, so there will be some activity in that time. This means that in those circumstances it will be necessary to reduce the proving time out of the fridge. In fact you may not need any time out of the fridge. Jack Lang refers to overnight in the fridge as equivalent to 2 hours of proving at room temperature.
On the other hand, with a slow starter (like my usual one), and a dough that is cool to start with, you won’t see an appreciable rise after 12 hours in the fridge, and you will still need to prove for three or four hours to get best effect.
One option that I have tried a few times now is to use a longish coolish prove (instead of the fridge). This is particularly suitable to temperate climates in winter. For example, a dough that has been shaped can be left at ~10C overnight, and will have proved enough to bake in the morning once the oven has warmed up. But you are going to have to do a bit of trial and error to see what works for you and your starter.
Glossary
Bulk fermentation - the first rising period after kneading. Allows yeast to multiply, air sacs in the dough to expand and flavour to develop.
Pre-ferment - this is a term used to refer to the generation of a starter or sponge for the dough. (In this recipe it is the ‘biga’ stage; for sourdough it is what happens when we refresh our starter before using it)
Proving (proofing, prooving) - spell it any way you choose. This is the period between kneading and baking, or sometimes used to refer just to the second rise (after shaping).
Replies
http://www.regional.org.au/au/roc/1988/roc198815.htm
This is from the Farrer Institute and written by a Cereal Chemist. He states, much to my suprise, that the kneading actually produces air pockets which are later filled with gas.
I have trouble reconciling this statement with the amount of bubbles obtained by using the “Dan Lepard” method.
regards
Bill
Thank you for any direction or help you may be able to lend me!
Rachel Ward
If I'm reading this right, the dough cannot rise in the refrigerator if the towel is wrapped around it and twisted, so it would mandate a room temperature rising of some kind?
Thanks,
Bettie
Rachel,
I've been making whole-wheat yeast bread for many years (and have just begun making the sourdough versions). The difficulty with using whole-wheat flour is that there is insufficient gluten relative to the weight of the dough so the bubbles don't expand sufficiently and the loaves tend to be dense. For years I solved this by making bread with half whole-wheat and half white flour, but a few years ago I began using 100% whole-wheat flour supplemented by wheat gluten (I use 2 T per cup of water in the recipe) which you can get at a bakery supply or at a health-food store. The loaves are 100% whole wheat, which I love for nutritional reasons, but come out light and fluffy. You may have other issues but adding gluten improves the crumb of your whole-wheat bread and helps make it deliciously light and chewy.