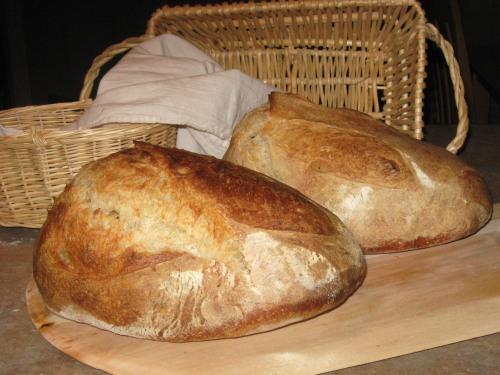


I baked a couple Norwich Sourdough loaves last night. They had bulk fermented for 24+ hours in the fridge, and also proofed 24 hours in the fridge.
Unfortunately I made the mistake of proofing seam-side down in the baskets! I realized my mistake just after popping them in the fridge.
The seams were barely visible when I turned them out onto the peel, but even with some slashes they still split at the seams. In the oven they rose into a sort of deformed alien spaceship looking shape.


But I'm not complaining! This was BY FAR the best oven spring I've gotten from sourdough, heck from any loaf I think. And the crumb is nice too:

I'm kind of glad I found out what happens when you proof seam-side down (and thus bake seam-side up), I don't think I'll make that mistake again! Although it is possible the oven spring was helped by the seam opening up, I do think proper slashing can achieve the same thing, while controlling the shape & look better. (You can see some evidence of the slashes I made in the darker sections of the crust but they couldn't compete with the seam I guess.)
Cheers
Mike
Replies
Nice looking crumb!
After you have sliced the bread, the crumb is what matters. No one can tell then if you proofed the bread seam side up. I promise I won't tell. ;-)
Occa
Do you think that's to do with the 24-hour bulk fermenting plus 24-hour proofing in the fridge? That's more than the recipe calls for, right?
I'd put it out for sale! That crumb is beautiful, and the rough finish just invites people to grab a chunk with their hands.
Just for fun you could try this sometime: form a boule and allow to rise, turn it out onto the baking surface, and stab it through the center, top-to-pan, all the way through. Make another cut the same way through the first to form a cross or "X". Just use an ordinary paring or boning knife with a blade maybe one inch wide. Immediately put a big handful of flour right on top of the cut and pop it into the hot oven.
The flour insulates the cuts and allows a lot of oven spring to push right through it, forming a kind of volcano look; the flavor of the roasted flour contributes to the quality of the bread. But it is a bit messy ...
Muff
Thanks! The long fermentations probably helped, although I don't really have enough experience to know for sure! (it was the first time I'd proofed that long other than for pizza dough)
That timing just worked out the best for me in terms of when I had time to make the dough, shape, and bake (always after the kids were in bed).
I was surprised that even with the long proofing, the bread is no more sour than other SD loaves I've made. I guess my starter is not an especially sour-flavoured one? One day I might try something that I read, about using your starter to make two separate preferment builds, and letting one of them get really sour (by not being fed as much), and then use both in the final dough.
@Muff, thanks for the idea, I will definitely try that next time. I was thinking of doing boules next anyway!