Welcome to SourDom's beginners blog, the tutorials are:
How to make your own starter.
How to use short kneads to handle moist doughs and bake a loaf with a yeast-based preferment.
The subtleties of proving a loaf using a ‘biga’.
How to shape a loaf using a hybrid recipe.
The final crucial steps and putting it all together to bake a 100% sourdough loaf.
 Contents:
- What you will need
- Background
- Recipe
- Troubleshooting
- Looking after your starter
- Glossary
- References
What you will need:
- White flour (preferably organic)
- Rye flour (preferably organic)
- Water (preferably filtered)
- A large clean jar or container (ideally transparent so that you can see what is happening)
- A spoon (to stir with)
- a little patience…
Background
Sourdough is the oldest form of leavened (or ‘risen’) bread. Baking presumably existed for a long time before that, mixing a paste of dried ground grains with water, and then baking it. However at some point someone must have discovered that if the paste or dough was left overnight, or for a couple of days, it started to change in appearance and odour, and that the bread when baked was lighter in texture, easier to digest, and stronger in flavour.
The oldest form of leavening was almost certainly due to this sort of accidental development of a starter, with small amounts of dough/paste being kept aside from one batch to leaven the next. At some point residues from fermented grapes or hops were used to provide an alternative source of yeast. Of course nowadays most baking is done with commercially isolated yeast.
Sourdough baking uses a technique akin to that earliest form of baking leavened bread. In this tutorial we are going to try to do deliberately what the ancients did inadvertently - to create an environment in which flour and water will naturally ferment. Once that fermentation has established we can use that culture of microorganisms to make our bread indefinitely (at least as long as we look after it properly).
Established starters contain a mixture of yeast and bacteria. Don’t worry, these bacteria are quite friendly (they are the same ones that are present in yoghurt, or that people consume deliberately in preparations like ‘Yakult’). The yeast and bacteria live together in a special sort of cooperative existence, with the yeast eating and breaking down sugars from the flour, and the bacteria feeding off some of the breakdown products from the yeast. The yeast provides the leavening action for the bread, but the bacteria are responsible for much of the flavour.
There are lots of different ways of generating a successful starter. If you are interested I have previously compared a couple of different methods.
One question is where the yeast come from that populate the starter. One theory says that they come from the environment (the air). Adherents of that theory (eg the ’starter doctor’ Brian Dixon) suggest leaving the jar/bowl open to the air - even having a fan over the bowl so that airborne yeasts will land in it. An alternative theory argues that yeast spores can be found in the flour (particularly wholewheat flour?), or alternatively on the surface of grapes/sultanas (that’s why some starter ‘recipes’ suggest using organic grapes or sultanas to get things going). If that is the case, then you can cover your starter with plastic wrap. I confess that I have always covered the top of my starter jar, without discernible problems.
To start with (lots of unintended puns here), here are some general principles gleaned from different sources.
1. Make sure that your containers are clean before you start. (I poured some boiling water in my jars and left them for 10 minutes beforehand, then tipped the water out). The idea is to try to avoid contaminating your starter with unpleasant organisms (the starter is especially vulnerable early).
2. Use filtered or spring water where possible
3. Use organic ingredients where possible (to maximise the concentration of microorganisms in your ingredients, and to prevent any inhibitory effect from preservatives/fungicides etc)
4. The aim of the refreshing steps is to add extra food for the organisms that you are culturing. Each time you refresh you need to add extra flour and water. You will need to throw some starter out to make room for this - otherwise you will rapidly accumulate litres of the stuff…
5. If you read around a bit the instructions all seem to differ, but are all quite dogmatic - you must use this, you mustn’t use that, you should cover, you musn’t cover etc. I think that what this probably means is that actually creating a starter is not that hard - there are lots of different ways, all of which can work.
6. Use a glass jar/bowl - you can see what the starter is doing…
The technique that I am going to use in this blog is one of the simplest of all. I am going to use flour (a mixture of rye and white) and water only, and we will see how we go.
Starter Recipe
The flour that I have used here is a combination of
Kialla white unbleached organic flour and
Wholegrain Milling organic rye
I made this starter in the middle of a Melbourne winter, so it was reasonably slow to get going. You may find that your starter becomes active quicker than these photos would suggest. If so that is great. You would still do well to follow the schedule for refreshing the starter daily for 2 weeks (see below).
Day 1:
Clean your jar and stirring spoon with boiling water
Add to the jar:
- 50g water
- 35g white flour
- 15g rye flour
Stir, and set aside for 24 hours.
Depending on the time of year and the ambient temperature, you may find it harder or easier to get a starter going. The best temperature for yeast activity (at least the sort that are found in sourdough) is about 30 degrees C (that’s 80F for any imperialists out there). If the weather is cool your starter may be slow to establish. If it is very warm there is a bigger chance of the starter getting contaminated with unpleasant bacteria. I have had most experience with getting starters going at about 20C.

Day 2
There won’t be much to see yet, but that’s OK.
Add to the jar
- 50g water
- 35g white flour
- 15g rye flour
Stir with a clean spoon, cover and set aside for 24 hours

Day 3
Still not much to see
Add
- 50g water
- 35g white flour
- 15g rye flour
Stir with a clean spoon and leave for 24 hours

Day 4
a few definite bubbles visible below the surface
Discard most of the starter (put it in the compost or the bin), leave about a tablespoon in the jar
Add 100g water, 70g white flour, 30g rye
stir and leave for 24 hours

Day 5
More bubbles visible, but the starter hasn’t increased in volume perceptibly.
Discard most. Add 100g water, 70g white flour, 30g rye.

Day 6
The starter has increased in volume (by a 1/3 perhaps), and has now lots of bubbles below the surface. It has a complex slightly fruity odour.
Discard most of the starter (leave a tablespoon at most in the bottom of the jar). Add 100g water, 70g white flour, 30g rye (getting the idea yet?).

Day 7 (onwards)
Using the above technique you will need to continue to refresh your starter daily for at least another week. Each time you will need to discard the majority of the starter, and add in new water and flour.
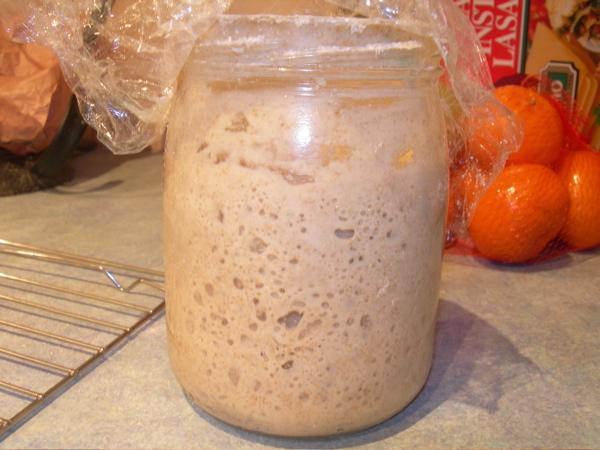
Your starter is ‘active’ when after 24 hours it has increased (doubled) in volume, has a thick layer of froth on the top, and a rich network of bubbles below the surface. It is now ready to use for baking.
(this photo was taken on day 8 of the above starter. You can’t see from the photo, but overnight the starter had reached the top of the jar, and a little had escaped. It had subsided since then (ie it is past its peak) - but I wouldn’t have any qualms about using it.)

Troubleshooting
1. Timing of refreshment
After your starter is refreshed - if you watch closely over the next 24 hours or so you will see bubbles start to appear, and the starter expand in volume. It will reach its maximum volume (’peak’) at a variable time, depending on the activity of your starter, and the temperature of the room.In a warm environment this might be at 12 hours or earlier, while in a cold room it might take more than 24 hours.
Generally speaking we would aim to use the starter at or close to this ‘peak’ time, though it will probably still work fine if it is used a few hours either side of this.
2. Low starter activity
If there is no sign of activity despite following the above instructions there are a couple of options. It may be worth while persevering for another week, refreshing daily. Alternatively it may be worthwhile starting again. You could try a different flour for your refreshment. You could also try adding about 10g of organic sultanas with the flour and water on the first day. Yeasts on the surface of the fruit will help to seed your starter and get things going.
3. Contaminated starter
If your starter smells unpleasant - like rotten eggs, or vomit, or something equally disgusting it may have become contaminated with less friendly bacteria. Don’t give up - it is often possible to resuscitate your starter. Wash a clean jar, and add a teaspoon or so of starter from your smelly batch. Add 100g water and 100g flour. Stir and leave for 24 hours.
Brian Dixon suggests leaving your starter out for 12 hours, and then putting it in the fridge. This might be worthwhile if your starter becomes contaminated in warm weather.
Avoiding disasters
Once you have carefully nurtured and raised your starter, you don’t want to lose it. Make sure that you leave a little starter behind when you are making your dough - so that you have enough to make more. This is important - don’t forget!
If there is someone in your house who intermittently has a cleaning frenzy and empties the fridge of UFOs (unidentifiied fridge objects), make sure they know what your starter looks like. Strange smelling white slurries in unlabelled jars would be fair game otherwise!
Other troubleshooting - have a look at the starter doctor…
Looking after your starter
Your starter is bit like a pet, it will respond best to a bit of regular attention and food. On the other hand starters are quite resilient, and will often survive a fair bit of neglect (it is a good thing that there is no such thing as a Society for Prevention of Cruelty to Starters…)
Starters will have most activity if they are fed every day. However unless you are baking every day this necessitates discarding a lot of starter, and many people find the waste of flour and starter distressing. An alternative is to put your starter in the fridge when you are not using it. It will happily sit in the fridge without feeding for days or even weeks, ready to come back to life when you need it. However it is probably worthwhile trying to refresh your starter at least once a week to keep it lively. Also if your starter hasn’t been refreshed for more than a few days it will probably benefit from 2 refreshes before baking with it. Make sure your starter is covered in the fridge or it will dry out.
Refreshing starter (recently used)
If your starter is active and has been used recently it will probably only need one refreshment before using it.
Pour all of the starter in your jar out (into the compost or bin). (Don’t worry - there will still be some left in the bottom of the jar - this will be enough to seed the next batch of starter). Add half the weight of starter that you need in flour (plus a little bit), and the same of water. For example for 200g of starter add 110g flour and 110g water to the little bit of starter left in the bottom of the jar. Stir well and leave covered in a warm place for 24 hours.
Pour your starter into the mixing bowl. Add 50g of flour and 50g of water to what is left in the jar (this will replenish your stock of starter), and leave for 24 hours before putting back in the fridge.
Refreshing starter (not used for a while)
This is Mick’s recipe for bringing a starter back to life. It uses 2 refreshes 12 hours apart (if the temperature is cold you may need to make this 24 hours apart). This has the advantage of minimising waste.
Divide the amount of starter that you need by fifteen.
To this amount of starter add twice the amount of flour and water (1:2:2). Leave for 12 hours. Add equal amounts of flour and water and leave for 12 hours (1:1:1).
It is less confusing to talk in real numbers. For example for 300g starter. 1/15 x 300 = 20g
Add 20g starter to 40g flour and 40g water (total 100g). Leave for 12 hours
Add 100g flour and 100g water (total 300g). Leave for 12 hours.
Don’t forget to leave a little bit of starter behind to replenish your stock.
Other types of starters
Some recipes call for rye or wholemeal starters. You don’t need to keep multiple different starters going (though some enthusiastic people do). You can convert your stock starter into a rye or wholemeal starter by simply refreshing it with that flour for a couple of days.
Note, that sometimes starters will go on strike when their usual food is changed. For example you might see a sudden drop in activity with the change to a different flour. If that happens you can either persist (the activity will often come back), or revert to your usual flour, and then add in the new flour more gradually. For example you could start with 30% rye, and then progressively increase the proportion of rye with each refreshment.
Glossary
Chef - see starter
Leaven - see starter
Levain - see starter
Mother - this is the starter that you keep aside to replenish your stock, and use to create enough starter for baking
Refresh - to add flour and water to a small amount of starter
Starter - this is a mixture of flour and water containing bacteria and yeast, that is used to leaven sourdough bread. (aka leaven, levain, chef)
References:
the starter doctor (Brian Dixon’s FAQ from rec.food.sourdough)
Dan Lepard’s instructions for sourdough
Replies
I recently got interested into baking and found this website very informative. I have been trying to make my own starter using the recipe here for the last 4 weeks due to winter temperature in Canberra. Instead of feeding every 24 hours I sometimes waited for 48 hours. Anyway I just want to say thanks for sharing this great recipe.
Instead of tossing out starter I use it to mke sourdough pancakes. I add a little flour and egg and milk .. beat the heck out of it and make pancakes.. No measurements . I use about 4 serving spoons of starter to one of flour to 1 egg and splash of milk to loosen it up. Its a sat/sun breakfast staple served with fresh fruit.
What a good idea, thanks for sharing! I'm just getting started with sourdough baking and have made a much doughier starter with a recipe I got from a book, but depending how it works I may use the more liquid starter suggested on this site going forward. If I do, I will definitely use this idea as I cannot bear to throw food away. xx
I just started getting intrested in this fresh bread thing, so I guess just read the instuctions and go. can use any help I can get.
Keep going a bit longer. Is it warm or cold? The cooler it is you may need to leave it longer between refreshing or keep it in a warmer spot.
Also read the troubleshooting notes. After perservering for a while it may be worthwhile trying again with a different flour (make sure it's unbleached). Was your rye flour wholemeal or "white". When I made mine I didn't use any white flour for the first stage (and maybe a couple of feeds after that), but introduced the white flour to the rye a bit later.
Good luck
I agree with Matthew too early to give up. I had to wait a solid 7-8 days, and I started in July when it is nice and toasty here in Ohio. If it is too cool in your kitchen try putting your culture in the oven with the oven light on... Make sure you don't accidentally turn your oven on
Also on day two or three is when all kinds of bacteria and yeast have a little party in your culture but this is not a culture to bake with. There are bad as well as good bugs in there at that time. As the good bugs begin to grow stronger and the lactic acid bacteria make the culture too acid for the bad bacteria growth seems to come to a standstill. But you should be able to notice that the smell seems more sour than before. That will let you know that your culture is working even though it seems about dead. As you continue a relationship begins to form between the yeast and the lab bugs and your culture will be viable and lively.
Patience is going to pay off in the long run. Every baker here has a story, we have all waited but the wait will be worth every second.
Terri
I'm starting my adventure into the world of breadmaking. My aunt gave me the "artisan bread in 5 minutes" cookbook, which, interestingly enough, is what motivated me to see if I could try to the real thing.
So, I'm on day three. Yesterday I followed day 2 instructions, and this morning the starter had increased quite a bit in size, I would say it nearly doubled. I live in Los Angeles, so it is decently warm during the day (not hot yet, but not cold). I'm wondering if I should be feeding more often than every 24 hours if it is already increasing in size. Should I accelerate the process and skip a few days in the instructions? Or should I stay the course?
Thanks
I live in a pretty warm climate too, and I feed every 12 hours when getting a starter going. I also only discard half the starter when feeding. But how often you feed should really be based on how long your starter takes to reach certain stages. In my (admittedly limited) experience you want to avoid feeding so often that you dilute the starter too much, but feed often enough that the environment doesn't become anaerobic (stir well when you feed to get as much oxygen as you can into the starter.)
Assuming a starter that is already active, once your starter has doubled in size and then subsided to its original size you can feed it again (actually you could probably feed it at the point where it has doubled.) But, at least in my experience, you can be pretty sloppy about it and still get good results. I would definitely wait a while before baking with it though. It takes a while for the culture to completely take over the environment. Your nose is your best friend here, but I'd wait at least a few days from the time that it starts to smell right, and preferably longer.
can you please tell me if its fine if I use biodynamic light wholemeal flour together with biodynamic premium white bakers flour? and if I run out of wholemeal is it ok to use more white than wholemeal?
It is rather frustrating..as I was feeding my previous starter for 7 days but does not smell too good...and has what appears to be are small amount of bubbles ontop......I just used biodynamic white bakers flour for that....
In my limited experience I found that warmth was the key to developing a starter. Left in a warm (England), sunny spot, the starter developed nicely.
I also found that the best bread results were achieved by using the leaven while still 'on the up'. I preferred to allow my dough less time to develop before knock back, letting it proove longer as a loaf/roll/baton. That way I got a more vigorous lift. Leaving to proove for 12/24 hours meant that the leaven had no 'oumph' left to raise my bread. I did not find too much difference in flavour. By adding a tiny amount of bakers yeast to the dough also ensured a better 'lift'. Remember - a dryer, fat added dough, gives a softer bread. A wetter, no fat dough has bigger air bubbles and a chewier crust.
I live in Northern Ireland, the temperature here is up and down (usually down) and 'sunny spots' are few and far between! It's October now when Im creating my frst starter- Just wondering if the dip between when the central heating is on / evening time VS the colder night times in the house; if that will affect the starter badly?
Hello DJBAKER,
Temperature variations aren't going to be adverse as such but you will find that things happen more quickly at higher temperatures (within limits) than at lower. You can store a starter in the fridge between feeds/bakes no troubles at all.
As for you question about coarse vs fine wholemeal flour, I can't see that it would make any difference to the starter though there might be a more noticeable effect of the dough development due to the coarser bran.
Good luck with your projects.
Farinam
Sorry, for those who have asked questions above and failed to hear back from me.
I have not visited this blog for a while.
If you have questions - always feel free to visit the beginner's forum where there are lots of people who check in regularly
Deborah - it is absolutely fine to use the flours you list - or to use all white if you prefer. I tend to prefer white/rye starters, and I think they tend to get going quicker than wholemeal ones, but there are plenty of people who use just wholemeal flour starters.
cheers
Dom
I've used 50% bread flour (white) and 50% COARSE wholemeal- wasn't sure which would be best wth the coarse VS medium ground wholemeal, if anyoine has any experince with this?
I'm on day four and it's doing exactly what it suposed to. Cant wait to bake some bread in my new oven. I will have some pictures of it on www.ourwholesomehome.com
We started a fresh starter batch last night using the instructions here. We'll see how it turns out. Our temps are a bit low (mid 60's) but it's no biggie if we have to wait it out a bit longer to get things going.
I've read a bunch of interesting things about using sourdough starters in older books and have wanted to try this for some time now. I guess better late than never works here right?
Jon.
I was on my day 5 and there was not much movement or bubbles but it did smell good. Last night I was almost giving up on it but I decided to go one more day, guess what I got up in the morning and it doubled in size overnight. I think the problem might be that it was cold for a week and dry in our house, my humidity level was at 25 inside and last night it started raining outside, the humidity in the house jumped to 40, that might have played a role. But I'm on my way to baking in my new wood oven that I just finished in my back yard. You can go and see it on my blog. http://www.ourwholesomehomes.com/search/label/Bread%20and%20Pizza%20oven
I just checked our starter and wow was I surprised. We are at about 2.5 days now and it's more than doubled in size since I fed it last night (12 hours ago). It smells extremely fruity too. Almost like the trash when it starts getting ripe. I'll continue on with the instructions here and feed it again tonight before going to bed.
Our kitchen is cool and very dry right now too. It's that time of year in Michigan. But our kitchen is very active. We cook fresh meals everyday and our kids cook and bake everyday too. Maybe all the stuff in the air is good for starters? In the past few days we've done pot roasts, chicken scampi, pickled eggs, several breads, gingerbread cookies and houses, sugar cookies, oatmeal cookies and who knows what else...
Jon.
Got up in the morning and first thing had to do was to check on the startrer, boy, it more than doubled in 12 hours. Am I glad that I did not through it out on day 4 and 5 when it was not groing at all. For all who might be in that position that it's not groing all I can say Keep at it.
www.wholesomehomes.com
A major point when anyone start with sourdough, and it's not mentioned enough. One of the main ingredient when working with sourdough is time and patience. The mix, been leaven, starter or dough will tell you when it is ready. Also in hot countries like Australia, South Africa or South America is the use of fridge after the start of activity noticed. Good luck.
success with my first starter according to this precipice. The only thing I did on the last few days I did not throw any away instead just added 100 gram water, 70 gram wheat, and 30 grams rye, that way I got 600 grams of starter ready. I bake about 12 loaves at a time in my brick oven, so I need more starter.
http://www.ourwholesomehomes.com/2009/12/sourdough-starter-my-first.html
Yesterday I started my first sourdough and am very excited to see what happens. So far so good.
How is it doing now?
I'm new for this web, I'm intested in everything about baking. I just wanted to say hello.
Laddavan
This is a great site for people to learn about bread and other baking needs, I personally learned lots from many people here. My first starter was made from this site and I just love looking at breads that people post here. Feel free to ask questions everyone here is very helpful and you will find a ton of great info. Visit peoples blogs and there own web sites there is also a load of info. Have fun and feel free to look at some of my bakes.
Great thanks! I got up and checked it on Day 2 to find that it had risen up to almost the top of the jar. I decided to follow the directions for day 6 and discard and refresh. It was looking good 12 hours later but overnight it got quite cold so didn't grow at all. I have discarded and refreshed this morning and am hoping that it is still going to keep going! I hope I did the right thing?
I am just in the process of growing my first starter using a recipe from Leith's Baking Bible. So far so good, day 3 and it is frothy and yeasty. I have just fed it according to the book with more flour and water and 1tbsp of malt syrup.
Reading through various posts on this site, I realise that no one else seems to add malt - I'll see what happens.
Two questions: my starter developed a crust - from instinct I scraped most of this off and threw it away when I fed it. Was I right to do this?
Second, Leith's book only takes me as far as baking the first loaf of bread. What do I do with the starter thereafter?
Many thanks for your ideas and suggestions
Joy
I have never added malt to a starter, but I don't see why it wouldn't work - the famous French baker Raymond Calvel apparently adds both malt and salt to his starter. Neither are strictly necessary, but try them and see what happens!
As for what to do with your starter after baking - make sure that you save some starter to make future loaves. You can keep it in the fridge, but it will benefit from feeding intermittently. If your starter has only been going for three days I would keep refreshing it daily for a bit longer (say at least another 3 or 4 days) before putting it in the fridge.
cheers
Dom
OK thanks for the advice, will post pics if the bread is sucessful!
Hello, I'm really excited about making my own bread without a machine. I have gone and bought the ingredients and finally found just the right jar for the starter. I am now ready to go but... Do I need to be measuring or weighing the water? Is it supposed to be 50 mls rather than 50 g? I'm a total novice and just want to get it right.
Hi Dyan,
welcome to the world of bread baking
You don't have to measure the water and flour exactly when you are making a starter. Mix a bit of water with enough flour to make a sticky paste
But it is probably a good habit to get into when you are starting baking to measure the ingredients accurately. Once you are confident with recipes you can be a bit more relaxed about the exact quantities.
1ml of water weighs one gram, so 50mls is the same as 50g
happy baking
cheers
Dom
I came across this blog whilst looking for an alternative to store bought bread. My husband is allergic to preservitive. This is an adventure I'm looking forward to exploring in full. Thank you so much for your encouragment. I'll let you know how I go. My son let me know the answer to my measure or weigh question with a "Duh Mum!" answer:)
I began my first starter 5 days ago. Quite excited by all of this. I love sourdough from the bakery but it's expensive. So I'll have a go doing it myself.
On the first day I started with 1 tbsp plain white flour and 1 tbsp of water. I added another tbsp of each about 4 hours later and then 2 tbsp of each another 4 or 5 hours after that. The next morning (day 2) again doubled the quantity (so 4 tbsp of flour and water) then that night I added 8 tbsp of each. (which was almost a cup of each) always stirring with each addition. I mistakenly stirred with a metal spoon first but after realising my mistake I am now using a wooden spoon.
Yesterday which was day 4 (in the morning) I threw out about a cup of the starter and it smelled really nice. Yeasty and sour. It also had quite a few bubbles. After throwing out a cup I added a cup of flour and a cup of water.
This morning upon checking the starter I noticed a layer of darkish coloured liquid on top of the mixture and it stunk!! It smelled disgusting and my son agreed that it really was gross. Oh no had it all gone wrong?? I left it till early this afternoon when I could trouble shoot on the net and found it is ok if it smells bad or seperates a bit just keep going. So I've just had another look at it and the smell has improved greatly just in 6 hours of so. So I have thrown out another cup of it and added a cup of water and a cup of flour.
Also each morning when I feed the starter I put the mixture in a clean sterilised (by pouring boiling water) container (I'm using a plastic microwave rice bowl wth a loose fitting lid which I don't put on properly).
Will keep you posted....
Simone why should you not use a metal spoon.
Hi Simone,
it sounds as if things are on the right track.
the problem with dark smelly starter sounds like it may have been contaminated by unhelpful bacteria
see the note above
"3. Contaminated starter
If your starter smells unpleasant - like rotten eggs, or vomit, or something equally disgusting it may have become contaminated with less friendly bacteria. Don’t give up - it is often possible to resuscitate your starter. Wash a clean jar, and add a teaspoon or so of starter from your smelly batch. Add 100g water and 100g flour. Stir and leave for 24 hours.
Brian Dixon suggests leaving your starter out for 12 hours, and then putting it in the fridge. This might be worthwhile if your starter becomes contaminated in warm weather."
unless your starter has gone bad there is probably no need to wash the starter jar each day. Likewise I wouldn't worry at all about stirring with a metal spoon. I have always stirred my starters with whatever came to hand - usually knives or spoons from the cutlery drawer.
In my experience you don't need as much as a cup of flour a day. 100g of flour is plenty (and less would probably be OK)
good luck
Dom
thanks for the tip re. the amount of flour I'm using each day. How do I know when it is ready to bake with? And do I then keep it in the fridge refreshing every week or so or what?
Hi again Simone,
I would give it a couple of days after the unpleasant smelling starter - to make sure that it is behaving.
If you have a starter that is doubling in volume (twice the height in the jar) (in 8-16 hours depending on the ambient temperature) with plenty of bubbles through the surface, and smells good, then you are probably ready to give it a go baking.
I would encourage you to continue to refresh it daily until it has had maybe 10 days to 2 weeks - then the mix of yeasts and bacteria will be well established. You can then put it in the fridge until you want to bake.
It is probably best to give your starter some fresh food every week or so if you can, though it will survive longer periods of neglect.
cheers
Dom
Well now I think my starter has died or something. it is now day 11 and all it seems to do is seperate so that the liquid is on top, the smell is the same - ok - but there are no bubbles or anything so there doesn't really seem to be much happeneing. So do I need to start again??
this morning my starter is very runny and smells like beer?...I haven't fed it yet because I don't know whether or not to chuck it out and stat again.
am wondering if it went wrong when I added wholemeal flour just once a few days ago because I had run out of the usual white plain flour that I use. Should I be using bakers flour instead of plain or is it the same thing with a different label?
your starter sounds as though it is overripe
you don't mention what temperature it is where you are, nor how long it is since you refreshed it.
if you have 50:50 water and flour it will usually start out as a thick sticky paste, but as the yeasts do their work it will become more sloppy and liquidy, eventually resembling a thick soup, or perhaps having a clear liquid on the top and white slurry below. How fast it does this depends, as I suggested, on the temperature. If it is very warm (as it is where I am at the moment in the UK) this will happen much quicker. If it is cooler it will take longer.
It may be that this will happen quicker with plain flour because of its lower gluten content (that is the difference between plain and baking flour). I don't know - haven't ever tried. I use organic bakers flour since that is what I use in my bread - it gives much better baking results than plain flour.
Don't give up, and don't abandon your hard work. You are getting there
Keep a tsp of your starter, tip the rest out and add 100g of bakers flour, 100g water. Wholemeal flour is fine, but will give different odours and a slightly different flavour to your bread. Rye flour, if you can get it, makes a great starter. Try adding a little to the white flour.
Next time you refresh have a look at the starter from time to time. You will first see a few tiny bubbles below the surface. They will get bigger and the whole thing will expand in volume. At some point it will be twice or more the starting volume with bubbles breaking through on the top. Then it will stop expanding and start to drop back. *This is the point when the starter is at its peak*, and you should refresh it again.
You might find, if it is warm, or your starter is very active that 24 hours is too long to wait in between refreshes, and that your starter peaks at 12 hours, or even 8 hours. This is a good sign of a healthy starter!
cheers
Dom
the temperature here is very cold as it is winter here in Australia and i am in the south. we do keep the house fairly comfortable temperature wise but perhaps is is a bit cool for the starter to work as quickly as in other places.
Will take your advice and keep a better eye on it so i can see what it is doing throughout the day. Also a glass jar may be better so I can see what's happening underneath.
At the moment I don't have baker's flour in my pantry (and I don't live close to the shops) so will keep persevering witht the plain though will perhaps mix with a bit of wholemeal.
Will keep you posted. thanks for the advice and for an informative website on all things bread - yum.
Well after starting all over again, again.....I have a large jar of wonderful starter (I think). Leastways it looks and smells good. So I've mixed together my first loaf: 1 cup of starter, 270g plain flour, 270g of wholemeal flour and 300ml water. Kneaded for about 5 minutes and is now rising slowly......
What a wonderful read! I have a starter in the fridge that I began working with since June this year and after a few nice loaves it went quiet on me. She's (her name is June for obvious reasons) being fed once a week and she seems quite happy. Now that we are having a couple of sunny days, I might bring her back out and get her active enough to see if she wants to help me make another loaf. All the comments and instructions on this page were excellent and gave me courage to try again. Thanks.
Oh Simone now I just want to know how it went? Do tell
I have only been baking my own bread for some 3 months now, using the dry yeast. I thought that was a good way to start. I used a breadmaker, since that broke down I have been mixing in my Kitchen Aid. I love making Bread and eating it too. My goal was always to make sourdough bread, as I come from Germany that is what I love best. So after doing a lot of research, I found your starter tutorial so helpful and am on my first day. Here is to it going well. Thanks so much for taking the time and effort to bring this information to us
Regards
hi everyone. my starter's on day 15 and has been fed religiously every day with 1/2 cup bottled water and 1/2 ww/white flour. it bubbles madly, smells good and tastes sour but it just stays the same size. i'd like to bake with it but there just isn't enough to fill 2 cups. any advice would be appreciated.
Just wanted to say what a wonderful starter this is.
I first came across this blog about 2 weeks ago after being inspired by my favourite show, River Cottage, to have a go at sourdough.
I started my starter the very next day.
With all the humid weather in NSW at the moment though....it was not happy.
I persisted. After a few days I was still getting that distinct rotting trash smell but I carried on, halving the mix & feeding. I so wanted to make the starter work, I havent rushed to use it.
This evening (particularly muggy weather) about 4 hours after its last feed, my hubby calls me to the kitchen, worried the starter is going to explode from its jar.
There are plenty of bubbles & it smells a little like cidar vinegar. I jump at the chance.
I now have 2 beautiful loaves proving and can not wait to bake them tomorrow evening.
Thanks so much for all the about advice, I found it most helpful, especially when my first efforts smelt so foul.
On Saturday I used a wholemeal flour-and-water batter to thicken a sauce. I had a very small amount left over, which I forgot to throw away. By Sunday morning a few bubbles had appeared. Being a keen bread-maker (but only ever using dried yeast), I suddenly thought of sourdough and fed the mixture with more flour and water. It's now frothing quite well, after only 36 hours. It occurred to me to look for sourdough websites and I found this one. I will now follow Sourdom's instructions and let you know what happens. Has anyone else got off to a purely unintentional start like this?
Pages