Welcome to SourDom's beginners blog, the tutorials are:
How to make your own starter.
How to use short kneads to handle moist doughs and bake a loaf with a yeast-based preferment.
The subtleties of proving a loaf using a ‘biga’.
How to shape a loaf using a hybrid recipe.
The final crucial steps and putting it all together to bake a 100% sourdough loaf.
 What you will need:
- Flour, water, salt, active sourdough starter
- Proving bowl
- tea towel
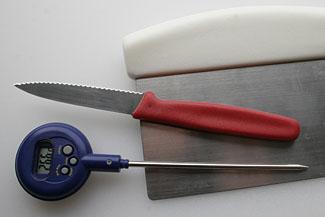
- very sharp knife or razor blade
- large piece of thick cardboard (see below)
- semolina
- oven stone or metal oven tray
- spray bottle of water
In this final tutorial we are going to talk about the final stages of dough preparation and then baking. We are also going to put together the techniques from the previous tutorials and bake a proper sourdough loaf. If your starter isn’t ready yet (ie showing lots of signs of life when you refresh it) use one of the other recipes as you work through this tutorial, and adjust the timings accordingly.
Background
The final stages of dough preparation are probably the most important steps in terms of the cosmetic appearance of the loaf. They are also some of the more technically challenging steps, and you will find that your loaves improve dramatically with practice. There are three components to this process, upturning and slashing the dough, transferring in to the oven, and the bake itself.
Slashing
Slashing the dough is more than just a way of making your loaf look professional or distinctive. One use of it in times past was to distinguish your loaves when they were baked in a communal oven. But they are also a way of controlling the growth of the dough when baking. The more oven spring that you have, the more likely it is that your loaf will burst or split, with a resulting uneven appearance, or unsightly ‘hump’. So creating a weakness in the surface allows you to direct where the loaf will expand most. However the number and direction of these will also affect the crumb of the loaf. See Bill’s blog on slashing loaves. The fancy french term for the slash in the top of a loaf is a ‘grigne’ (lit. ‘grin’ ;))
see also Jack Lang’s sourdough tutorial for pictures of various styles of slashing
The two most critical factors in a good slash (of a loaf I mean) are the sharpness of the blade and the demeanour of the slasher (for more on this see details below).
To get the best effect use a razor blade or something similarly ultra-sharp. Bakers use a special tool to hold a dispoasble razor blade - called a lame.

I have been using a type of ’stanley’ knife from a hardware store for the last 6 months or so. It has the advantage of being able to lock the nasty blade out of the way (away from tiny prying fingers). It is also one of those ones that you can snap off the end of the blade after it has become a little blunt, rather than needing to replace the blade frequently.
Alternatively some would suggest using a sharp serrated knife.
Transferring
In the tutorial on proving we talked about the relative frailty of dough that has reached the peak point of proving. Overhandling at this stage will lead the dough to collapse as the swollen air sacs inside burst and the air escapes. This is especially likely if the dough has been left too long (referred to as ‘over proving), and the resulting loaf will be flatter than it should be, with less oven spring. So the key principle is to be gentle but rapid in handling the dough, and to transfer it in to the oven as quickly as possible. There are a couple of different ways of doing this.
Professionals use a special type of flat wooden shovel or ‘peel’. Dough is flipped or unmoulded onto the peel, then slid off the peel onto the floor of the oven. The cheapest and simplest way to emulate this for a domestic oven is to use a piece of stiff cardboard. Cut one panel out of a heavy duty cardboard box, and keep it somewhere handy.

Alternatively you can unmould your dough directly onto an oven tray which you can place in the oven. (This reduces the risk of your dough ending up in a sad mess on the floor). The disadvantage of this is that it reduces the extra spring that you can get from putting your dough directly onto an oven stone. One compromise (particularly useful with fragile or very sticky doughs) is to use a metal tray, but to place it directly on top of the oven stone. Half way through baking (by which time the dough will have set enough to reduce the risk of disaster) you can transfer the dough on to the stone, to finish baking.
The bake
There are a few variables that will effect the quality of the finished loaf. Advice about temperature of the loaf is hard to give, as it will depend a lot on the specifics of your oven, and the veracity of the oven thermostat. You might find it helpful to buy an oven thermometer to check the temperature that your oven achieves. Home bakers will often bake at around 200-210C, but it is possible to bake successfully at temperatures below and above this.
Perhaps more important than the actual temperature in the oven is the distribution of heat. In particular, having a good source of radiant heat underneath a baking loaf improves the height that it will rise to with baking (this is the “oven spring”). The best way to achieve this in a domestic oven is to use a reasonably thick ‘oven stone’ or tile, which is placed in the oven before it is switched on, and allowed to heat up well before baking. (I use an ‘unglazed quarry tile’ that is about 2cm thick. It needs at least 3/4 hour of heating in the oven before it is ready to bake on).
 (This is Bill44’s stone and oven - it is far cleaner than mine ever looks…)
The other variable is the humidity of the oven. Professional bakers inject steam into the oven early in baking. This has an effect on the ’spring’ of the loaf, as well as the crust. Moisture on the surface of the loaf leads to gelatinisation of sugars and protein in the crust, and leads to a crunchier crust. It is difficult to copy this closely in a domestic oven, but there are various tricks that home bakers use.
Have a look at theartisan for a great summary of suggestions from various cookbooks. The most common suggestions include
- spraying the dough with water before putting it in the oven, and then spraying again every few minutes for the start of the bake
- putting a tray with water at the bottom of the oven
- tossing some ice cubes on a tray at the bottom of the oven
I have had most experience with the second of these, and until recently have tended to pour 1/2 a cup or so of water onto a pre-heated tray at the bottom of the oven at the same time as I put the dough in. This generates a lot of steam, and I then tried not to open the oven door in the first 20 minutes of the bake to prevent it all escaping. The one potential disadvantage is that if there is too much steam hanging around it seems to slow cooking of the base of the loaf.
Spraying the top seems to reliably give a good crunchy crust.
Instructions
Lets get down to business. For this bake use the Pane Francese (1) recipe, which is the original sourdough version of the recipe that we have worked on in these tutorials.
Friday 8am
Refresh your starter (this step generates the active starter that we use for sourdough baking).
Add 1 teaspoon of active starter to 90g of flour and water. Stir, cover and leave for 24 hours in a warmish place (room temperature is fine unless your house is freezing).
Saturday 8am
Your starter will have increased in volume, have lots of bubbles below the surface (visible if you used a transparent container), and have a layer of froth or bubbles on the top.
Stir together the active starter, and 320g water. Add the flours and salt. Mix to a rough, ragged mess. Leave for 10 minutes
8.15
Turn your dough out onto an oiled surface or tray. Knead for 10 seconds only. Leave for 10 minutes.
Give your mixing bowl a quick wash, and dry. Toss around a little olive oil into the bottom and place the dough back into the bowl.
8.25
Quick knead on oiled surface. Put the dough back into the bowl
8.35
Quick knead for 10 seconds. Put the dough back in the bowl. Cover, and leave for 1 hour
9.35
Scoop your dough out of the bowl onto a lightly floured surface. Slash the top if you like to see how it is going, but it won’t be ready yet (see proving tutorial). Give the dough a fold (again see proving tutorial). Put back in the bowl, cover and leave for an hour at room temperature.
10.30
Turn out your dough and fold. (Slash the top if you like to see how it is going). Put back in the bowl and leave for 1 hour.
11.30
Turn out your dough and slash the surface with a sharp blade. If there are lots of tiny air pockets visible below the surface it is ready to shape. If not give the dough a fold and put back in the bowl. Leave for 1 hour.
12.30
Turn out the dough and slash the top with a sharp knife. If it is ready - go ahead and shape now (it probably will be, but if your starter is sluggish or the room is cold it may still need longer).
Shape the dough into a ball (see shaping tutorial). Let the dough rest for 10 minutes
12.45
Shape the dough into a baton (see shaping tutorial). Place the dough seam side up in a proving basket, or wrap it in a floured tea towel.
Cover the dough and leave it to rise (at warm room temperature say 20C) for 3 to 4 hours.
3.30pm
Put your baking stone in the bottom of the oven and turn the oven on.
4.15-4.45pm
When your oven has warmed up get a few things together.

Get out your piece of cardboard, and toss a tablespoon or two over the top - spread it out with your fingers. Have to hand your spray bottle and your razor blade/stanley knife. Grab some oven gloves if you need them.
OK, now lets just run through in our mind what we are going to do, because the aim is to unmould the dough and get it in to the oven in less than 10 seconds. In slow motion the steps are
1. unmould the dough from its tea towel or proving bowl onto the cardboard ‘peel’. (When you do this sometimes it will end up a little out of shape. It is OK to gently push it back in to the desired shape, but remember we don’t have long!!) If your loaf sticks to the towel or to the proving bowl you didn’t use enough rye flour. Not much you can do about it this time, but you will know for the next loaf!

2. Spray the top with water. (If you were going to put any toppings on the loaf (see below) this would be the moment, but we aren’t going to today)
3. Slash the top. For this loaf make a long incision along the long axis of the loaf down the middle. There are all sorts of fancy cuts that professionals will make, but to start with keep things simple. Have the knife at a 45 degree angle to the surface of the loaf - the aim is to make a sort of superficial flap rather than to cut a straight line. Be bold and decisive. Think of a horror-movie throat slashing stroke and you will get the idea. The aim would be to make a cut about 1/2 to 1 cm deep, but don’t get too focussed on that sort of detail.
 Slightly blurry picture of dough with slash along the top
 Note the angle of the blade to the dough. (This is a dough that has angled crosswise slashes rather than a longitudinal slash)
 Close up of slash in a well-proved loaf (note the bubbles)
 My ‘assistant’ pointing out the slashes
4. Pick up the dough on the peel, open the oven door, slide the dough off the peel onto the oven stone and close the door again.
- OK - got all that? If you are too slow with the whole business the loaf will tend to flatten out into a sort of frisbee or pancake before it has time to hit the hot surface of the oven stone. One last time before you do it just run through the steps. Ready now to give it a go? OK
- unmould
- spray
- slash
- pick up and shovel into the oven
- close the door, breathe a sigh of relief
You got it!
Have your spray bottle to hand. Every couple of minutes for the first 10 to 15 minutes of the bake open the oven door quickly and give the loaf a quick spray with water. (Careful not to burn yourself).
Watch through the oven door and you will see a few things happening.
The dough will rise vertically (this is the oven ’spring’). The slash on the top will start to spread apart, and the softer dough underneath will bulge out.
After a little while the slash will stop spreading and the dough will stop expanding. At this point the top of the loaf has set, and can’t expand further. (If the loaf has not proved enough (ie is underproved) it may still try to expand, and the loaf will sometimes develop a bulge or split at the base where the crust is not completely set.) At this point if you open the oven and poke the top of the loaf it will feel firm, but the sides and base will still be softish.
As the dough cooks further the top will colour, and the rest of the crust will set. If the top goes too deep a colour before the base is set, it may be that you need a lower oven temperature. (It is for this reason that some bakers will lower the oven temperature after initially putting in the dough in a very hot oven. This maximises the ’spring’ effect, but then tries to prevent the top from overcooking).
To tell if the base is set put on an oven glove, and gently lift up the loaf. Tap on the bottom with a finger. If it is soft it is not ready. When it sounds hollow to tap, the loaf is ready to come out.
Take the baked loaf out and put on a rack to cool.


DO NOT give in to the temptation to cut into a hot loaf! The insides have not finished cooking yet, and the bread is not fully digestible when it is still hot from the oven.
Enjoy…
Toppings
Just as it is possible to make all sort of different cuts on the top of a loaf to make it look distinctive, it is also possible to add to the appearance of a loaf by adding different toppings. After you spray the loaf (but before you slash it) sprinkle it with sesame or poppy seeds, or perhaps rolled oats. Have a look at Jack Lang’s tutorial for some ideas and pictures
Where to from here?
Fantastic. You have now baked a full monty sourdough loaf. If you have worked your way through these five tutorials you have made your own starter; learned how to use short kneads to handle moist doughs and bake a loaf with a yeast-based preferment; you have appreciated the subtleties of proving with a ‘biga’; you have learned how to shape a loaf using a hybrid recipe, and finally in this tutorial you have worked on the final crucial steps and baked a 100% sourdough loaf.
From here your loaves will improve as you become familiar with sourdough baking, and get the hang of some of the fiddlier elements. The main trick is for the start at least (no pun intended) to stick to one recipe, and bake it multiple times until you are happy with it. Keep a note book, and write down any changes that you make, or things that you try so that you can keep track of what worked and what didn’t.
In the next couple of blogs I will talk a little about timetables for sourdough baking, and also some more about sourdough recipes and how to vary them to your tastes and needs.
Replies
I'll see if I can resurrect the picture links when I get a chance.
cheers
Dom
Hi Dom,
I read somewhere that you lived in Melbourne. I am building a facility to teach small groups in all aspects of home cooking. I was wondering if you would like to share your knowledge to the general public this way.
I am in Narre Warren South.
Regards
Rebecca
Hi Rebecca
Maybe I got something mixed up as it was while ago but I remember something about Dom moving overseas.
I will send you PM with some ideas.
Regards
Tom
I use scissors for slashing- very easy and no drama compared to a razor blade or a knife.
I will buy some bannetons when I can, however I made my second loaf yesterday and this time I used a flour tea towel to shape the dough. When it came time to 'unmould' the dough I was at a complete loss. The dough was much too soft to pick up or roll off the towel. I eventually ended up trying to shove my 'peel' (bottom of a tart tin) under the bread while still on the cloth but this damaged the loaf somewhat. Some more specific instructions would be most helpful.
Many thanks for the great advice so far.
Helen
Hi Helen,
I use a long skinny cane basket with the floured tea towel draped in it for a batard or a colander ditto for a boule. To turn it out you can then place your peel over the top and upend it, remove the container and the cloth with the loaf safely on the peel. Another way is to do the same with a sheet of baking paper over the top, get a good grip of the paper and the container and over she goes. Then put the paper on the bench and slip your peel under that and transfer loaf, paper and all to the oven. You can do the whole bake on the paper if you wish or you can whip it out after the loaf has set properly (about 15 minutes).
Keep on bakin'
Farinam
Thanks once again for a prompt reply! For my first loaf I did something similar and will be sure to do the same for the pain au levain I have fermenting in the fridge at the moment (except will bust out the rice flour this time in an attempt to stop it sticking to the tea towel). I just keep looking at the images of baguettes and batards proofing in their cloth folds and wonder to myself how on earth these end up in the oven.
Hi there. I have been reading all of your blogs and am going to try your starter. I had been using a potato flake starer recipe before but I want to try a more real artisan starter. I am in the USA so I was a little confused trying to figure out the conversions of metric to our measuring system. I think I have figured it out, we'll see when I try to mix up my starter. In regaurds to the Baking process:
I read the instructions for the bread recipe. What temprature do you set the oven to and how long to do need to cook it for?
Hi everyone
"Friday 8am
Refresh your starter (this step generates the active starter that we use for sourdough baking)."
Can I refresh the starter Thursday night and it will be ready to go Friday morning?
Mal
Yes.
That is what I do. Take 90g from my stock in the evening/late afternoon and double up with 45g flour and 45g water and leave covered on the bench overnight. In the morning make your dough.
After you make your starter feed your stock with 45g flour (mix of rye and white if that is what you do) and 45g water and back into the fridge until next time.
Good luck with your projects.
Farinam
Hi newcomer here, only on day 3 of my starter but reading through everything in readiness.
Can the picture links be looked at please as they look all broken from here.
Great site, been really helpful so far (first starter from elsewhere just didn't really get going at all)
This is quite an old thread so I doubt if the links to the photos will be put back up by Sourdom. He hasn't posted for some time by the looks.