Welcome to SourDom's beginners blog, the tutorials are:
How to make your own starter.
How to use short kneads to handle moist doughs and bake a loaf with a yeast-based preferment.
The subtleties of proving a loaf using a ‘biga’.
How to shape a loaf using a hybrid recipe.
The final crucial steps and putting it all together to bake a 100% sourdough loaf.
Note: yeast is used in this tutorial to create a practice dough as it is assumed that you do not have an active sourdough yet. Sourdough bread does not contain commercial yeast.
 What you will need:
- flour, water, yeast, starter
- tea towel
- sharp knife
- colander or bowl or banneton for proving
Background
This tutorial is going to focus on shaping your dough, and as such is going to build on some of the technique from the last tutorial (on proving), and anticipate what we will talk about next time (slashing and baking).
There are of course all sorts of possible shapes that loaves could take. We are going to cover the basic shapes here, but once you have conquered these the sky is your limit!
There isn’t so much science to shaping, so we might as well get straight into it!
Instructions
For this tutorial we will use a hybrid recipe using a small amount of yeast and some sourdough starter. One of the reasons for doing this, is that hopefully by the time you are working through this tutorial your starter is already showing signs of healthy activity, albeit it may still be a little young. (It is quite a good way of using up some of the starter that you would otherwise have to discard!) That won’t matter for this recipe. This ‘hybrid’ recipe also highlights some of the principles behind these sort of breads. (Once you have got your starter alive and well you probably won’t ever want to return to hybrid breads, as they aren’t as good as the real McCoy - but they are quite convenient)
Use the ‘Pane Francese 4 - hybrid’ recipe
Friday 8am
refresh your starter with 100g water and 100g flour
Saturday 8am
Add the yeast to the hand hot water. Stir and leave for 10 minutes.
8:10
Add 180g of your starter, and stir, breaking up any lumps with your fingers. Add the flours and salt. (You could use wholemeal flour instead of spelt, though the latter has more flavour). Mix to a rough sticky mass. Cover and leave for 10 minutes
8.25
Knead for 10 seconds on an oiled surface. Clean the bowl. Swish a little olive oil in the bottom of the bowl, put the dough in the bottom, cover and leave for 10 minutes
8.35
Knead for 10 seconds on an oiled surface. Put back in the bowl, cover and leave for 10 minutes.
8.45
Quick knead, put back in the bowl, cover. Leave for 3/4 hour
9.30
Slash the top of the dough. Have a look at the bubbles developing below the surface. Turn the dough (fold twice - see last tutorial for details). Return to the bowl, cover and leave for 45 mins
10.15
Slash the top of the dough. If it has a lot of small bubbles below the surface it is time to shape (go to the next section), if not give the dough a turn and leave for another 45 minutes.
Shaping
You are going to need a bowl to prove the dough in. For this tutorial we will aim to make a round loaf. If you have a bowl with reasonably steep sides that the dough will fit in, and have enough room to rise use that. (You can also use a colander). To avoid sticking use a tea towel, and rub a handful or two (be generous) of flour into the towel. Line the bowl or colander with the floured tea towel. (Hint - using rye flour to rub into the towel will reduce problems with the cloth sticking).

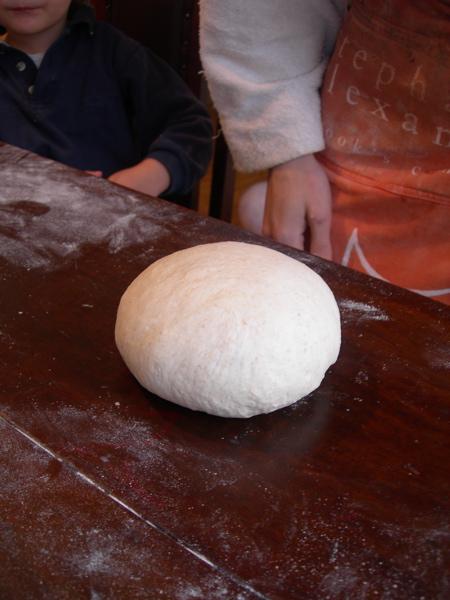
1. Lightly flour a benchtop and your hands (not too much flour!!)
2. Take your dough and press it down a little with your fingers into a rough fat circle(don’t press all the air out, that’s not the aim).
3. Grab hold of a bit of the dough furthest away from you (12 o’clock). Pull it away from you (stretch it a bit), then fold it in to the middle.

4. Turn the whole dough anticlockwise (direction doesn’t matter of course) 1/8th of a full turn. (Your folded bit will now be at ~ 10-11 o’clock)
5. Grab hold of the dough at 12 o’clock, stretch and fold in.
6. Turn the dough anticlockwise.
7. Repeat (go back to step 3) until you have gone all the way around the dough.

Flip the dough over so that the folds are on the bottom.

Now is the time when you will discover if you put too much flour on the bench (if you have brush/wipe it out of the way).
1. Put your left hand on the side of the dough (9 o’clock). (This hand will steady the dough, but you are aiming to use the friction of the table to stop it moving too far).
2. With the heel of your right hand push in the right side of the dough (3′o clock). Your hand will push in (to the left) and down, so that the circle will become an oval shape, and dome upwards. There will be a slight stretching of the top surface of the dough. (If the table is too floury the dough will just slide across the bench. If the bench is not floury enough the dough will remain stuck to the bench and you will have to peel it off - you want somewhere in between!)

3. Turn the dough an 1/8th of a turn clockwise (again the direction doesn’t matter).
4. Repeat (back to step 1)
As you turn the dough around and push in with your righ hand, it will be becoming more ‘domed’, and the top will gradually be getting more taut.When you have turned the dough all the way around, and it is looking like a half sphere with the top surface stretched out it is ready.

For a ‘boule’ or round loaf, you should now flip it over into the lined proving bowl (ie smooth side facing down).

Cover the bowl, and let rise for 3-4 hours at room temperature (see proving tutorial for further details about this).
Heat oven to 210C.
Gently tip out the dough from the basin onto a tray. (With a lined basin you can ease your hand underneath the towel, and lift the dough and towel out together, then turn it over onto the oven tray).
With a sharp knife make one or two quick slashes across the top of the loaf (more about this in the next tutorial).
Quickly put the tray into the oven, and bake for 40-50 mins.
Other shapes
Baton
Start by shaping into a round (as above).
Cover the dough with a cloth on the benchtop and let rest for 10 minutes
(In what follows you will need a little flour on the bench. If there is too much, the dough won’t stick to itself as it is folded, and will tend to unfold again)
Grap hold of a bit of dough at 10-11 o’clock. Stretch it away and fold it in to the middle.

Now grab a bit of the dough at 1-2 o’clock, stretch and fold that in.

The two folds will meet, and there will be a bit of a point at the top end of the dough (12 o’clock). Grab this point. Stretch it out and fold it in the to the middle.

Now turn the whold dough around 180 degrees. (The bit that you just folded will now be closest to you. Repeat the above steps. (Fold in the top right corner, then the top left corner, then fold in the ‘point’ to the middle).

Now take hold of the dough and fold it in two towards you.

Press down on the dough with the heel of your hand to seal the dough. If the seam isn’t sticking together pinch the edges with your fingers.
Now place the baton in a lined bowl or banneton (with the seam facing up)

Alternatively place it on a floured tea towel (with the seam facing up). Fold the tea towel over the dough, and twist the ends underneath.
Let prove.
Bake.

Baguette
A section on shaping baguettes is almost redundant once you have watched Jack Lang’s excellent video demonstration.
In case you can’t watch the above here is a simple description.
Shape the dough into a boule (see above). Let dough rest for 10 minutes.
Shape into baton (see above).
Place the dough seam side up in front of you. We are now do a series of folds (like folding a letter) of the dough. Each time it will get longer until it is the shape of a baguette.
As above you need enough flour on the surface to prevent the dough from sticking, but not so much that it won’t seal.
We are going to fold the far side of the dough towards us (leaving 1/3 of the dough exposed). Rather than folding it in one go however we are going to pinch and fold little bits at a time.
Starting at one end, grab hold of a bit of the far side of the dough, stretch it away from you and then fold towards you (not all the way). Move your fingers along the dough a small distance and do the same again.

Keep going until you reach the end of the dough. Press down on the join to seal the edges

Now turn the dough around 180 degrees and repeat the above folding.
Do this two or three more times until you have a long thin piece of dough. Roll it briefly on the floured benchtop to smooth it out.

Flour a tea towel (with rye flour). You can make a ‘couche’ (literally a ‘bed’) for the dough by folding up the tea towel on either side of the dough. Place something like a rolling pin or telephone book against the tea towel to help the dough keep its shape. Cover the dough and let prove.

Foccacia
Start by shaping into a round (see above)
let the dough rest for 10 minutes.
Place the dough on an oiled baking tray.

Take a pinch of the outer edge of the dough and stretch out.

Move around the dough a bit of the time, stretching it out until you get back to where you started.
Let the dough rest (covered) for 10 minutes.
Repeat the stretching one more time.
Dimple the top with your fingertips. Drizzle with olive oil, and dress with herbs/salt etc.
Put the oven tray in a hot oven directly on top of an oven stone (if you have one). When the crust has set slide the foccacia off the tray onto the stone to make the base crispy.

Bannetons
You can prove your loaves in lined bowls or colanders. Professional bakers and serious home bakers often use special proving baskets (known as bannetons).
The advantages of bannetons are the predictability of shape, and the contour of the basket. (Improvised bowls found lurking around the kitchen often are a bit shallow, and result in flattish loaves).
Some come with a special linen liner. Others (such as the cane baskets in the above pictures) can be used without a liner. The basket is lightly dusted with flour before use, and allowed to dry out afterwards. The cane leaves a distinctive grooved appearance on the finished loaves.
Bannetons can be hard to find. The best source of them that I am aware of for Australian home bakers is the sourdough shop.


Replies
What is the correct baking for sourdough, also can someone please explain prefement hydration?
Is it possible to use a white flour and whole meal flour for the starter? I tried it and it really started to stink after a few days.
The links to Jack Langs video's are no longer valid. The forum is still current, but not the videos