


There's been a lot of discussion on other blogs about the various stages of making a loaf of bread and how people go about it. And I thought, why not put together a pictorial record of what I do. Now you will probably think that as a photographer, I'd make a good baker (or vice versa) and some of the shots do have a strange colour cast about them. However, in my defence, I was trying to avoid getting dough and other undesirable substances into the working parts of the camera and some buttons got pressed and knobs twiddled for which I have little idea of the purpose.
Anyway, enough of the excuses.
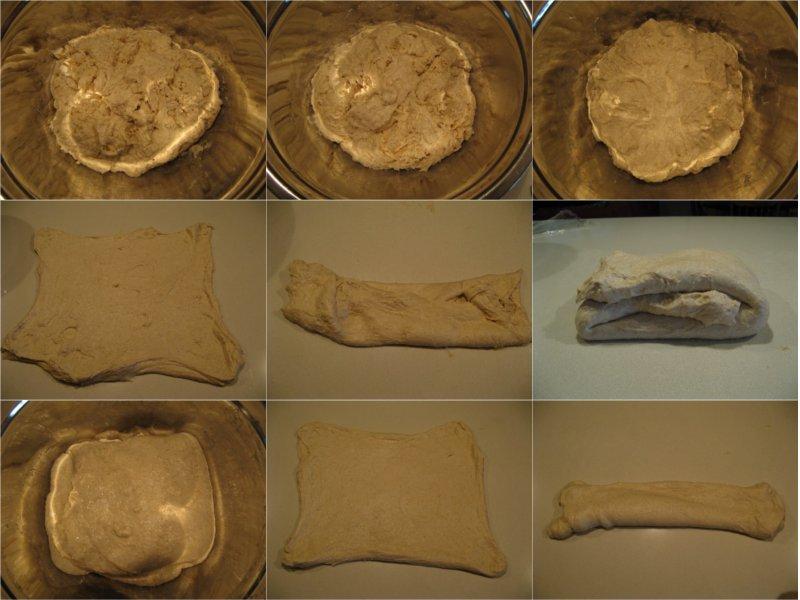
The recipe was the bog standard Pane Francesa from SourDom's beginners blog. Unfortunately, I didn't get a pic of the nicely active starter so the series starts from the freshly mixed dough followed by post-autolyse and cutting in of salt. Then follows the series of stretch and fold that were done at one hour intervals.

If you look carefully at the bottom right photo you can see an air bubble trapped between the folds about an eigth of the way from the left hand end. This indicates that dough is already gaining strength and can form quite thin membranes when stretched.

I think you can see what I mean about the strange colour casts. You also get the impression of the greater dough strength in the final image. In the bottom left photo, the dough was actively resisting stretching and trying to spring back.

In this sequence, we go from pre-shaping and shaping, through proving (at about one hour intervals) to turning out, scoring and into the oven. If you look carefully at the creases in the tea-towel and the edges of the basket, you can see the extension and rise of the loaf during proving.

Here we see the progressive rise and browning of the loaf (at about five minute intervals) leading to the final result.
Well, that's about it. As I said, it is only one way of many to get there and if another way suits you then that's OK by me.
Hope you find it useful and instructive.
Keep on bakin'
Farinam
Replies
Very good Farinam. As a designer I have worked a lot with photographers. What type of photographer were/are you professionally? Mostly I worked with corporate/general types tho I did work with some very good food photographers.
Hello Cielkaye,
I was trying to indicate that I am neither photographer nor baker. Oh well, so much for subtle humour.
Farinam
Farinam, maybe I am just thick.
Igettit!
Great series of pix! You could get the colour cast you want if you use Picasa editor (free download). Irfanview is also a nifty re-sizer of images.
Farinham,
Thank you !!!! this is long overdue a series of pictures that we beginners can compare their dough and process stage with. Its nice to see the different stages. What a wonderful loaf and the oven spring is immense..
Thanks for sharing
Linda
What a great way to illustrate the step by step process, I love it and find it really handy to see. Especially with the folding I wasn't really sure what to do but you showed it very clear.
One question though, what was the timing and duration for each stage and the oven temp you baked the loaf in?
Again - congrats, great effort!
Hello Aggie3,
Glad you find it useful, that was the hope for the side.
From starting mixing the dough to first S&F was one hour. From first S&F to last S&F was three hours. Progress total 4 hours.
From last S&F to shaped loaf 30 minutes. Progress total four and a half hours.
Proving 4 hours. Progress total eight and a half hours.
Oven preheated to 250C. Reduced to 220C when loaf put in (with steam bath) left for 12 minutes. Removed steam bath, reduced temp to 210C for 8 minutes. Removed baking paper, reduced temp to 190C for 20 minutes. Oven off, door ajar for 10 minutes. Removed loaf to rack.
That's it.
Farinam
Thanks Farina, that's perfect.
I'm going to bake my third loaf today as well as a pizza with the starter following the lenohb blog. The dough is already in the fridge since yesterday.
Will call in later on to report back
Cheers Aggie
Your pics have cheered me up no end - I'm not so bad after all. And your saying that there are several ways of getting there, well that's nice to hear too. Actually some of your pics look like the stages I have gone through.
Thanks indeed.
Thanks farinam,
Loved your 'One way to make a loaf of bread'.. I wish I'd found it yesterday as I was baking my first loaf! The start of my process seemed much like yours - strong rubbery stretchy dough - but as time went on it became soft and flabby and hard to do anything with. I couldn't really see any air pockets either when slashing. I began to doubt my starter, but it had literally overflowed its container so active enough I would think.
From your photos I see I have to stretch it more. Also the hours you spent on each part of the process are a great guide.
Eating my bread now which tastes fine, but has a fairly close crumb, and in the oven did not really rise out of the slashes. Not a brick but a large river stone perhaps?
Your pics make me want try again!
Crumbs
The thing about going from a mold (bread pan) to a basket is the need for a much stronger dough, so I've learned after two miserable attempts with my expensive new banneton. I even made a fairly dry dough of 100 starter (100%), 200 water and 400 AP flour. I think that one over-proofed. At any rate, I need to pay more attention to the dough's strength and just throw it in a mold if it's weak.
Kath
This is an interesting thread (which I hope I'm not high-jacking, but adding to..) I have always proved my dough by kneading (now usually by hand, occasionaly using my mixer with dough hook), forming into a nice tight ball, dusting with flour and leaving for 4 or 5 hours to rise - often in excess of double original size. I've recently been referring back to a bread book I have (River Cottage Bread - those in the UK will probably recognise the title..) where the author suggests removing the proving dough every hour, pressing it out flat and re-shaping. He suggests doing this 3 or 4 times before shaping the loaves. This clearly seems to replicate the stretch and fold system.
This is a technique I'm not used to. Can someone suggest why this is a better approach then just leaving it to rise without any further intervention. I'm baking today, so may try the press out and reform system and see what happens. Trouble is, I've varied my standard loaf today by adding 25% rye into the mix, just to ring the changes, so may not have a true comparison as a result..
Thoughts?
Hello boxsaloon,
I guess that was the reason I said - one way to make a loaf.
My understanding of one explanation is that gluten will develop with the input of either time or energy. When you are working with commercial yeast, the culture is so active that you don't really have the time and have to put in the energy through vigourous kneading. With sourdough you generally have more time so the energy input can be less if you wish.
That said, I have used both approaches with equal success - vigourous knead and leave to prove or the stretch and fold as above.
As for Hugh's method (I assume he kneads first as well as works during proving) if it works that is fine. I expect that it might redistribute the yeasts to access fresh food supplies and possibly might help to create a more open crumb.
On the latter topic, and this is only an observation, it appears that vigourous kneading results in a finer crumb than from stretch and fold. My thinking is that the initial air pockets generated during kneading, into which the carbon dioxide generated by the culture collects, are finer and more uniformly distributed by the higher energy input. S&F on the other hand makes for larger airpockets and a more open irregular crumb.
Good luck with your projects.
Farinam