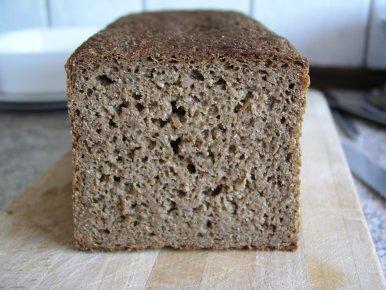
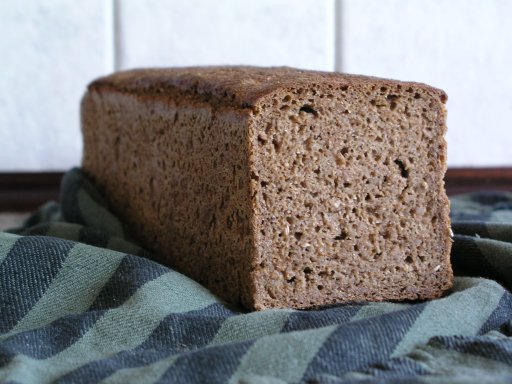
This is a basic every-day rye bread with not too much going on, just great rye and sourdough flavour. We eat it for lunch with butter and ham, pate, salami, cheese or other good stuff. You can also toast it and eat it with cheese for breakfast if you're a real rye lover.
Nina's danish ryebread
(Makes one loaf in 3,3 l tin)
Day 1, sponge:
175 g active rye starter
510 g water
170 g stout or porter
150 g cracked rye grains
90 g spelt (or rye) flour
410 g rye flour
Mix starter with liquids - if the beer is cold heat the water and mix befor adding. The liquid should be lukewarm (colder if it's very hot outside). Mix in grains and flour. (I mix with a wooden spoon and only in the end mix with my hand to make sure everything is well mixed.)
Let the sponge stand at room temperature (or somewhere warm if it's cold outside) for 14-24 hours covered with a damp cloth. Spray the cloth with water if it dries out.
You shouldn't worry about catching the sponge at its peak, in fact it's supposed to overprove. When you use the sponge it should have risen significantly, collapsed just a bit and have a nice sour smell. The rising time is depending on room temperature and how sour you want the bread. It's very flexible really.
Day 2, dough:
180 g water
10 g muscovado sugar
18 g salt
1505 g sponge (everything from yesterday)
50 g spelt (or rye) flour
320 g rye flour
Dissolve sugar and salt in water, add to sponge. Add flour and mix, spoon first then hand. The dough should be too thin to knead but too thick to pour. Use the spoon to get the dough into one or more tins. Unless you have the fantastic Eva Professional rye bread tin with non-stick inner coating you should lubricate the tin with butter or cover with baking parchment. The tin should be about 2/3 full, leaving room for the dough to rise. Use a wet dough scraper or spatula to flatten the dough in the tin.
Cover with a damp cloth and let it proof untill the dough has reached the top of the tin - could be anything from 2½-5 hours depending on temperature.
Turn on the oven at 185C (365F) and gently remove the cloth from the tin. Spray with more water if it sticks. When the oven is hot, spray bread with water and prick small holes with a fork. Put the tin in the oven on a baking sheet so the bread is in the middle of the oven.
After 10 minuttes lower the temperature to 175C (347F) for 1 hour and 15 minuttes. Cover the tin with tin foil (to prevent the crust from getting too hard and thick) and bake for another 45 min.
Turn off the oven and gently remove the bread from the tin. The sides of the bread will still be somewhat soft at this point. The Eva tin is just turned upsidedown and the bread slips out all by itself. Now put the bread in the oven for another hour using the afterheat (is that a word?), placing it on the baking sheet.
After 1 hour remove bread from oven and brush with neutral tasting oil (I use peanut oil) on all sides. Let it cool on a rack. When almost cold wrap in tea towel, when completely cold put bread in plastic bag still wrapped in the towel. The next morning remove the towel and store in bag only.
You should wait at least 2 days from baking till cutting the loaf! In that time the crust will go more soft and the inside less sticky. The crust should be firm but not hard and crunchy and the inside should be slightly damp but not very sticky. Slice thinly (5mm or so, fresh loaves might need to be cut slightly thicker) with a GOOD bread knife. The bread will stick to the knife, so be sure to clean it right after slicing or you'll have a cement-covered bread knife. If slicing more bread at a time you might need to clean the knife once in a while.
This bread will stay good to eat for at least 10 days after baking. It will not get mouldy but with time it dries out and gets too dry to eat. This might be obvious to all of you (not to my mother!) but do not store in the fridge.
My comments:
I'm still a bit unsure about bakers percentages... if someone could help me out with calculating them for the recipe I would be thankful.
This recipe is for a single loaf baked in a big 3,3 l tin. If baking in smaller tins, try lowering the baking time to 1-1½ hour with the heat on and 30-45 min on the afterheat. Trial and error ;)
The beer will add malt and a dark color to the bread. I prefer using beer with not too much alchohol (6% stout is my favorite). In Denmark very sweet dark malt beers called 'whitebeer' and 'maltbeer' (very low in alchohol, about 2%) is very cheap and easy to come by and makes a great bread. I just don't think you can get them outside Denmark. I guess you could replace the beer with water and malt if you can't find a proper stout or porter replacement.
Sometimes I replace the water on day one with an infusion of fennel and star anise. This gives a great but very subtle taste and smell to the bread. You can also add honey as well as different seeds and soaked grains.
I find that adding spelt gives a better texture (the crumb will not be as likely to crumble) and the bread will still keep good. You can use white flour instead if you're having problems with the texture, but it does stale just a bit faster in my experience. You could also just use 100% rye.
Note: I use wholemeal rye flour, not sifted.
Some people advocate intensive mixing of rye bread doughs. I prefer not to but I have yet to find out if it actually makes a difference.
Replies
Thank you, Nina, for taking the trouble to type out your recipe in such great detail with lots of side-notes. I can safely say I've never eaten such a heavy bread before, besides pumpernickel, but I'll give it a shot...just received my rye flour.
This is one giant loaf, around 2kg...I'll probably make half...or quarter. Using [url=http://www.glennbech.com/bakerspercentage/index.html]this calculator[/url], the hydration works out to 85.5%, assuming your starter hydration was 100%. Perhaps, someone else can do a counter-check?
By the way, what's with the fork marks? Your kitchen isn't messy in the least! You should see mine.
Thanks, again.
Ditto!
Jeremy
Thank you, Nina, for taking the trouble to type out your recipe in such great detail with lots of side-notes.
You're very welcome. I'm very interested in seeing what other people can do with this recipe. :D
TeckPoh wrote:And thanks for the calculator link.
By the way, what's with the fork marks?
That's actually a good question, I've never though about that. I looked it up in three baking books and all said you had to prick with a fork prior to baking, but not why. My guess is it's to allow steam to exit through the holes instead of the top crust flying off. But then again it could be one of those 'because my mother and grandmother did it'-things.
This month on the 22nd we're leaving our city flat and moving to a small farm property with my mum and stepdad. Ah, space and clean air! I talked my mum into sponsoring another Eva tin by promising I'd supply them with rye bread for just the cost of the flour. Getting another tin will allow me to do comparative baking - yay!
My plan is to test quickly mixed dough against well mixed dough. And I could test fork pricking versus non fork pricking as well.
Hi Nina, TP,
I don't know about the fork marks in your danish bread. But I do know that on the German soiurdough forum I read, somebody doesn't slash his breads, but instead has a littler 'rolling device' which he uses to prick his breads. ('It looks abit like those round hairbrush and I suppose it turns'). He claims it serves the same purpose as slashing, that the breads doesn't break during the oven rise.
I would have linked you to the picture, but I can't find the thread at the moment - it was months ago and there are thousands of messages.
I would think that your fork marks serve the same purpose, after all you are basically doing the same thing just with a different tool.
BTW, moving out into the country sounds great! Hopefully one day, we'll get there too. My favourite country for this would be NZ! We'll see... Enjoy!
cheers, -FlourGirl
Very impressive loaf thanks for sharing your rye bread formula with us Nina
the crumb looks nice a moist
will add this on my to do list.
regards Normbake
Hi FlourGirl,
A dough docking tool, perhaps, such as: http://www.bakingtools.com/productdisplay.aspx?catid=94 ?
Regards,
Giles
P.S. I don't know anything about that tool or the website; it's just a random link I picked from a Google search.
My understanding is that the "docking" serves the same purpose as slashing. I think the high percentage rye doughs don't have the gluten structure to survive slashing so the small holes do the job instead?
Hi Nina,
Thanks for the recipe, I am working on it today! Will post if acceptable!
Jeremy
Gosh you learn new things everyday in this forum
must try docking my dough instead of a slash
Normbake
I think docking is used only on low gluten breads such as rye. Not sure how it would turn out with a wheat bread.
[quote]
Day 1, sponge:
175 g active rye starter
510 g water
170 g stout or porter
150 g cracked rye grains
90 g spelt (or rye) flour
410 g rye flour
Day 2, dough:
180 g water
10 g muscovado sugar
18 g salt
1505 g sponge (everything from yesterday)
50 g spelt (or rye) flour
320 g rye flour
[/quote]
Nina - percentages are usually expressed as a proportion of flour weight in that stage, but sometimes expressed as a percentage of flour weight in the total recipe.
So 1st stage flour is 500g
Starter 35%
water 102%
stout 34%
rye grains 30%
spelt 18%
rye flour 82%
2nd stage flour is 380g
water 47%
sugar 2.6%
salt 4.7%
sponge 396%
spelt 13%
rye flour 87%
at least that would be the way that I would work it out
cheers
Dom
Jeremy, I'm so curious! Please do post about your results!
Dom, Thanks for helping me out with calculating. I wasn't sure wether grains counted as flour or not.
Ah, why is my birthday so far away? I want one of those dough docking tools... and a proper bench scraper.
Hi Nina and all,
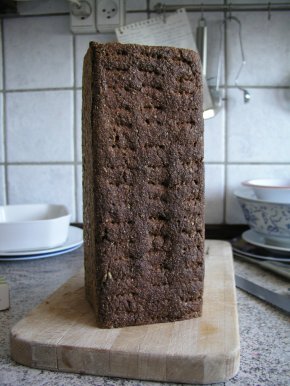
I tried so here it is!
[img]http://i3.photobucket.com/albums/y85/jergra/8434cd98.jpg[/img]
Dunno it's very dense, maybe because I didn't have any spelt so it's 100% Rye!
Cheers,
Jeremy
Looks good, Jeremy. Now you have to wait for 2 days to eat it, lol. Did you [i]dock[/i] it? <------ Can't resist using a 'new' word.
Wow, that looks so good!
This kind of bread is supposed to be rather dense. That's why you slice it thinner than white bread. And you always eat it with butter and something on top because it's so 'heavy' you can't just eat it with soup or salad like a good white bread (well at least I think so).
My last 100% rye (the one I messed up while baking) came out kinda crumbling. I'm not sure if the problem was no spelt or the confused baking...
PS: Hubby is standing beside me saying that's a very impressive first rye bread ;)
Actually I have done other rye bread this is just my first at Roegbrod from Denmark, thanks again ;)
Have atry at the Miche I posted, it's delicious!
Jeemy
Oops, that's what I meant, first danish rye bread...
Your Miche looks fantastic! I think I'll give it a go when I bake next week. :D
Wonderful recipe and first time went brilliantly
Since then the loaves have all sunk in the middle when baking. I tried reducing the water which was better, but the loaf was a bit harder. Any suggestions? How does temperature affect this?
River
I've been looking for a Rye Bread recipe without wheat. Your recipe is the closest so far. I plan to bake it this week and let you know how I make out. Thanks for posting it! Jacqueline (chicago, IL, USA)
Rye sour dough can be a bit tricky to get right from scratch, so to make it easier my first sour dough is mixed from
1 cup rye meal (same as rye wholemeal)
1 tub of plain yogurt (in Australia it is known as Greek yogurt) and
the same amount of buttermilk (use the empty yogurt container as a measure)
You shoul end up using the same volume flour as yogurt/buttermilk.
I then find a nice and warm place to start it up. If it happens to be during winter, I place it in the microwave without closing the door completely, so the light is on. This creates a temperature 25-30C inside the oven. I stir it once or twice a day to supply some oxygen during the process.
After 5 days the starter is ready for the first loaf.
Please forgive me if this is not the right place for this post, ie. if I am hijacking the thread, but here is the recipe I have developed over the years:
Day 1:
For the very first loaf, I mix the starter sour dough (as described above) with 500g rye meal and just over 2 cups of water. (From hereon, I only use 400g rye meal and 2 cups of water together with 500g sour dough from the last bread - see day 2).
Then I leave it to rise overnight.
Around noon next day, it should have risen to double size, and Nina is correct that the temperature is important - not only for the time to prove, but also for the flavour.
Prove it below 20C and you get a more sour bread, above 20C and it will be less sour.
Personally, I like my rye bread sour, that's why I prove it overnight.
Note: Day 1 is actually where you make the real rye sour dough and the sour dough for the next loaf.
Day 2:
First, I remove 500g of the dough into a convenient container, sprinkle the top with a bit of salt, and place it in the fridge (can last for up to 3 weeks without any attention). This is the sour dough for the next bread.
Into the remaining dough, I now mix
400g wheat flour
1/2 cup of water (approximately)
1-3 tablespoon of salt (depending on taste - personally I use 1 tablespoon)
1 teaspoon of dry yeast (optional, but it combines the flavour of sour dough with the texture of yeast bread)
1 tablespoon of malt extract (try your local supermarket)
The malt extract gives the bread the typical flavour of a Danish rye bread, but golden sirup is a reasonable substitute.
Your dough should end up with a consistency of very thick and heavy porridge.
I now pour it into a greased 3-liter tin and leave it at room temperature until it has risen to the top of the tin. (I always weigh the tin and dough so I get exactly a 1.25kg loaf).
I never do, but when risen you can prick the top with a fork to avoid the chance of a pocket of air just below the crust (in Denmark they call such an air pocket "the handle").
I now place it low in a 190C hot oven to bake for 1 hour and 50 minutes.
When finished I turn it out to cool with the crust down. Only if the loaf is for a special occasion or a present, I brush the hot bread all over with melted margarine. This makes the loaf look spectacular.
To avoid a very hard crust, after 5-10 minutes of cooling I put it into a plastic bag while it is still hot. Then I leave it to cool.
Day 3:
I cut the loaf into about thirty 8-10mm slices and pack them 6 slices at the time for the freezer.
Comments:
Don't be discouraged if the first loaf is a little flat in the flavour, because from loaf number two, when your first real sour dough is made, it is just plain sailing.
On day 1, it is important only to use your old sour dough, rye meal, and water, because this is your sour dough culture you are now nurturing. So NO other sorts of flour, grains or the like should be added - this is all done on day 2. If you remember this and remove 500g on day 2 every time you make a loaf, your sour dough can go on forever.
You can freeze your sour dough should you go on a long holiday, or you just don't feel like baking for a while.
If you have a friend who would like to give it a go, you can add an extra 250g of rye meal and an extra cup of water on day 1. Then remove extra 500g of sour dough for your friend on day 2.
On day 2, you can add whatever you like, such as grated carrots, mashed potatoes, sunflower seeds, cracked rye grains, or mixed grains. Just remember that it all adds to the volume in the tin.
If I use 250g sunflower seeds I then only use 350g rye meal on day 1, and 350g wheat flour on day 2. Also keep an eye on the water needed - you probably will need a little less.
Cheers for now,
Poul
I used Dan Lepard's starter (http://www.caterersearch.com/Articles/2006/02/03/304978/bread-from-leave...), it took about a week to get moving.
Thanks for the great recipe Nina. So simple even a man can follow it.
A few bits for anyone in Melbourne Australia:
I found a Wiltshire Square Bread Pan at Myers, it conveniently comes with a lid to use in place of the alfoil during baking. It's about 2 litres so it only takes 2/3 of this recipe.
Habib Wholefoods (http://www.yellowpages.com.au/bi/habib-wholefoods-melbourne-vic-5614171....) have pretty much every flour & grain you need, including cracked rye which was hard to find. I used Eden Valley Rye Flour from there. Muscovado I had to get at Leo's (http://www.leos.com.au/index.html)
Obviously you will be using James Squire Porter (http://www.jamessquire.com.au/#/beerPorter/), I'm not affiliated with them other than as a beer drinker.
Jesper.