


Hey everyone!
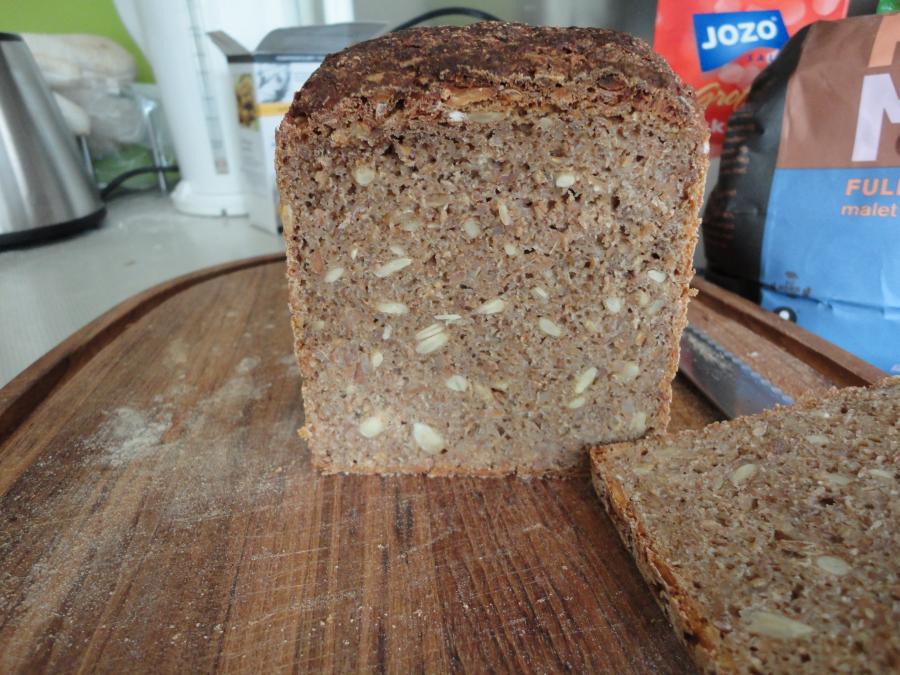
I thought I would share with you a recipe passed to me by my mother, it is a 100% rye bread with tons of authority. (My brother and I once joked that one of my moms bakes could be used to kill a man, and the evidence could then be eaten). It contains rye flour, cracked rye grains, and any bird seeds or seasonings to your liking. No wheat in this recipe! Although it can of course be added - but I really do love that taste of full, juicy sour rye. Now, the recipe I use when I bake rye breads is pretty much based on feel and look, but I have done my best to dot down some rough numbers. Of course, these numbers (especially the amount of water you need) will very greatly depending on how much calcium and other mineral your local water contains, how "dry" your flour and grains are, etc. So bear with me, take the numbers in the table below with a grain or two (or many) of salt, try for yourself and consult the pictures I took of my recent bake for how the stuff "should look" :)
The Dough
| Ingredient | Metric | Imperial | Baker's Percentage |
|---|---|---|---|
| Wholegrain rye flour* | 700 grams | 24.71 oz | 100.00% |
| Cracked rye grains | 500 grams | 17.65 oz | 71.43% |
| Water* see text | 1000 grams | 35.3 oz | 142.86% |
| Established rye starter | 150 grams | 5.3 oz | 21.43% |
| Salt | 25 grams | 0.88 oz | 3.57% |
| Optional: Various bird seeds* see text | 150 grams | 5.3 oz | 21.43% |
| Optional: Malt syrup, honey, or other sweetener. | 14 grams | 0.49 oz | 2.00% |
- Total Flour Weight:
- 700 grams
Percentages are relative to flour weight (flour equals 100%) and every other ingredient is a percentage of this. Flour from the starter is not counted. This recipe was originally in grams and has been automatically converted to other measures.
Rye starter: If you dont have one or can find one from a friend or familymember, these guys are the easiest in the world to get going. As with most other starters, mix equal parts wholegrain rye flour and water, 50g of each, and set in a warm spot (25 deg works). Every day feed it a little flour and water in equal parts and stir it up. Within a few days it should start producing bubbles, a few days more it will rise in volume. This is where you take a tablespoon full of your new starter and feed up with fresh flour and water. Rinse and repeat a few times, rye starters are usually very easy to maintain, very tolerant towards stress and fast to get going! A lot easier than those pesky wheat starters (Dont tell my starter I said that).
Day one - the sponge:
I like to do this in the eveningtime, since the timings line up for an evening bake on the following day. I grab my jar of rye sourdough starter right out of the fridge. In one bowl I mix aprox 400 g of wholegrain rye flour, some 5-600 ml of water, and the contents of my sourdough jar. I do not scrape the jar very thoroughly, for reasons explained in a moment. Yes, this is a lot of water, but the rye flour I use also absorb a lot of water, and I find this amount to really make the sponge rise nice and delicious. I mix the whole thing thoroughly.
In another bowl I put 500 g cracked rye grains. Fill the old sourdough jar halfway with water, screw on the lid and shake until all the remnants of sourdough starter is dissolved. I pour this over the grains, stir, and add water so that the grains are just covered (consult photo), not more. Too much water will result in the need of too much flour on day two to soak the water, resulting in a "less grainy" loaf. The addition of some starter to the grain mix will start a slow development of additional, great grain taste and acid in the grains :)
Now, all there is left to do is to wash the jar, and from the first bowl imidiately take around an equal volume of sourdough as you originally had. Screw the jar shut and put in the fridge; this guy can keep for 3-4 weeks and still be good as new when you wish to bake.
Cover both bowls with a slightly damp cloth and let the sourdough magic work overnight.
Day two - mix and bake:
The following day, the sponge should have risen considerably in volume, and smell nice and sour. In principle, you can bake as soon as it has risen to around double, but I like to wait until the sponge is just barely starting to reduce in volume again, I find this enhances the sour taste of rye that I so worship.
I mix the now soaked rye grains into the sponge, along with ~25g salt, any sweetener I might use (I often put a tablespoon of malt syrup in), and any bird seeds. You can use whichever bird seeds you like, or omit them entirely. I find that a handful (aprox 150g) of sunflower seeds makes the bread stay juicy and moist for a longer amount of time. This is actually the only reason I add bird seeds - if the bread had the same staying power with as without, I would do 100% flour ;) but as I am just me, it takes me some time to get through an entire loaf.
Stir thoroughly for a minute or so, to allow the salt to dissolve. It sounds like a lot of salt for a loaf of this size, but it works in the end. Now, add more wholegrain rye flour until the consistency of the dough is right. This is not easy to have a precise measurement for due to the above mentioned reasons, but the dough should just barely still stick to your finger when you press it deep into the dough bulk (see pictures).
Having achieved the right feel of the dough, start putting it into a baking tin (or two, if you want smaller loaves). I use a 11x11x30 cm baking tin, and the above recipe produces dough that fills this nicely. Make sure to "mash" the dough into the corners, it is vital that no pockets of air persist in the packed dough. The tin should be filled no more than two thirds to the top. Smoothen out the upper surface when done and cover with a damp cloth for the final rise. This takes anywhere from two to five hours, depending on weather and temperature. A day of winter and high air pressure, it might take 5. On a relatively warm summer day with low air pressure, a loaf can rise in just 2 hours. It should reach the top of the tin - thats when you know it is ready for the oven. Put the tin in a cold oven, turn it on to 200 deg celcious and bake for 2 hours. Then remove the loaf from the tin, and wrap a damp cloth arond it; the moisture from the cloth will be absorbed into the crust and help soften it up slightly. Leave overnight before you cut it, as the baking process is not done until the bread is cooled off entirely. Enjoy with your favorite bread topper!
Replies
Hello Thraundil,
That looks excellent. I must try it some time - so many breads, so little of the former.
I have read elsewhere, and I think Graham talks about it in his rye blog, about very long, low temperature baking times that result in much darker colouration of the crumb. Have you had any experience with this?
Keep on bakin'
Farinam
Thanks for sharing,
this looks challenging but feasable for the Sunday baker that I am. Starting the rye starter tomorrow.
hurray, a new challenge!
Olivier
farinam; Yes, time! The ever limiting factor. If it wasnt because of work, I would probably be baking several breads daily - my helpful friends have often offered to take excess bread off my hands. The good thing about this bread is it takes a relatively short time (its not like it needs half hourly turns an dthen stretch-and-fold every 10 min for a half hour), one evening with 5-10 mins to prepare the sponge, then the next afternoon another 10-15 mins to prepare the dough. 2-4 hours later slap it in the oven. Of course getting the routine and the feel of the sourdough takes time but I have baked this bread maybe 10 times since I got the recipe from my mom and already I feel I have a good mutual agreement with the sourdough. I give him food, he gaciously lets me live!
I did try to bake my bread like a pumpernickel bread two times. The first time it was my standard dough as given above. I wrapped the tin in tinfoil and baked it 120 degrees for 18 hours. To test the result I sliced it imidiately, but the middle was VERY sticky so I gave it anotehr 1½ hour without tinfoil at 200 degrees. This became really tasty, still bit sticky on the inside and with a bit hard crust. When I did the same next time I didnt add sunflower seeds, and I baked it in tinfoil 18 hours and no tinfoil 1½ hours, but the crust ended up being SUPER hard and the inside was almost raw still :/ so theres still a ways to go with this technique. I think if you aim for the long bake, that you should make a less hydrated dough than I do, but otherwise the basic recipe should work fine. However the sunflower seeds become weird during a long bake :p so basically, the taste will change from the sour-ish rye taste into a more caremelised sweet rye if you bake it pumpernickel style. I do plan to refine my bread to be able to bake pumpernickel as well, but as I currently am working on perfecting my 70% hydration what dough proofing its going to have to wait for a little while yet. When I do get to pumpernickel, I will share my findings :)
Olivier; glad to help with the flour types and stuff. I'm a PhD student in chemistry, and although its physical chemistry I work with, I actually find that sourdough baking is made even more awesome because I have a good time thinking about the kinetics and biochemichal processes that goes on xD It is a challenge, but only to the extend of getting a friendly relation with the starter and then knowing the right consistency of the final dough. Of course you cant find this out until the next day when you slice it, but if your bread is sticky inside after 2 hours of bake, add more flour after mixing the grain and sponge. If its too dry, add less. Note the recipe can easily be scaled down (for example to half) for test bakes. This does not change the baking time by much (subtract maybe 10 mins if half size, keeping in mind the tin goes into a cold oven from the start). Its a perfect sunday bake project! Good luck, cant wait to see your result :)
G’day Thraundil
I’ll give your recipe a crack next time. I’ve been through lots of rye loaf recipes but the last few years I’ve stuck to Nina’s plain “Danish rye bread” on this site.
I do love my “Rugbrød” every day for lunch without fail being an ex. Norseman.
Cheers
Right! I tried to modify my dough a little bit and then baked a splendid "Pumpernikkel". According to my findings, however, the dough needs to be significantly more dry than for my regular rye bread; due to the long bake time, I wrap the bake tin in tinfoil, keeping the moisture more or less trapped. Hence, a drier dough gives a sufficiently wet environment.
Some rough numbers:
~100g rye flour 150 g water and a tablespoon of my regular rye starter in one bowl. 250 g cracked rye grains with ~250 g water and another tablespoon starter in another bowl. Ferment overnight as per use. The next day i slapped 15 g salt, ½ tblspoon malt syrup (I could have saved this, the resulting bread is very sweet on its own), another 50g rye grains (simply to make sure the dough wasnt too wet, dry grains absorb plenty of water), 50g malted wheat flour and 50g wholegrain wheat flour (to make the dough connect better, so to say, also the malt flour really adds something to the flavour). And like, a LOT of rye flour. Another 150-200g. The dough was really tough and rough. Almost as a ~65% hydration wheat dough to the eye. Thats about how much flour I worked into it. It takes so much flour that you almost think "duuuude, this is far too much". And then a little more. Otherwise, it becomes a sticky crumb instead of a wet and juicy crumb, like you want.
Anyways this whole mix was stuffed into a small tin (like, 18 by 10 by 10 cm), covered with a piece of baking paper and then I wrapped the tin thoroughly in tin foil. Put it straight in the oven (this was around midnight), turned on top 50 degrees celcious. It baked like this for 10 hours, then I cranked up the heat to 100 degrees for some 6 hours, then increased again to 120 degrees for 4. Then I turned back down to 100 degrees for 3 hours. It was 11 pm at this point, and I turned the oven off and let the bread, tin wrapped and all, cool off in the oven overnight. The resulting bread was abit "wet" to the touch the next morning - I probably should have unwrapped it sooner, but it was sleepy time. I let it dry off abit during the day, and the following evening I cut the first slice. Beautiful, rich taste that is simply impossible to describe properly! Here are a few pictures. The lighting on the first one is abit deceptive, but on the second picture you can see a slice compared to a slice or two of my regular, 100% rye bread. The only difference between the two doughs is the bird seeds in the regular bread (and then a specker of malted flour - but I doubt that affects the colour)! So dark and rich.
Good luck with it! I hope you'll become addicted to it just like me :)
Malt is the predecessor to beer. Clasically, barley is used; the barley grains are allowed to germinate, whereby enzymes in the grain turns the starch into glucose. The germination process is then stopped by drying the grains - the degree of roughness of this process varies depending on the end goal. For the brewing of regular beer its done relatively mild at for example 50 degrees C. Whereas for darker malts you practically roast the germinated seeds, bringing a darker colour and richer taste to the end result. Its fairly difficult to do this yourself though, I think, its a pretty complex process. Typically I would soak whole grains in water for 2-3 days, then let them sit in a bowl for around 5 dages where you regularly stir to avoid the small roots to tangle. Then, slap them in the oven, experiment with the temperature. You dont want to burn them, but you still want them to be as dry as a regular, dried grain. And then, mill the little bugger ^^
It is not strictly nessecary to include in the bread, however. I just put abit in because I thought it would taste funky. Pumpernikkel should be just fine with pure rye. What I use is commercial malt flour that is made in a very specialised organic millery, so I dont suppose its a very common thing, but it has a very special taste and smell. It will be a lot sweeter than regular flour, while at the same time have a smoky smell to it.
It turned out very like your pictures, so I am pretty chuffed. Lovely rye smell when cutting, nice flavour and sourness. Not so interesting toasted, which may explain why my Danish brother-in-law would never do that. I may have to get used to bread with coffee for breakfast?
Used my normal wheat flour starter for convenience. Made half the recipe, but added less than the required amount of rye grain as I couldn't get cracked grain, only whole. Whole grain needs to be soaked longer probably, as the bread has a few hard bits in it. Is it possible to crack rye grains in a food-processor?
Thanks for the info on malted flour. Haven't seen it in the shops, so was hoping it was just a mixture of malt and flour. May give that a go anyway.
Cheers
John
Coffee grinder is your answer if you do not want to purchase a grain mill (oh how I long for one too). I learned making homemade baby food that standard home food processors (even a decent one) tend to just stir the grain around. I now use my extra coffee grinder (same one I use for spices) as a grain grinder. Try just a few short pulses and then check as each one is very different. My outcome seems to be quite variable in grain size, but I am very pleased with the results. I used the 1-2-3 method discussed on this sight and stir in various soaked grains adding a bit of honey to the dough. I soak using a mason jar and covering with a little water to spare over the top (about 1/2 to one inch...sorry for American measures). I like to add a little whey leftover from yogurt making to the soaking liquid. I have used this process of grinding and soaking for all sorts of grains including amaranth, various wheats, spelt, kamut, millet, oat groats, buckwheat, rye, etc. The bread is so good with a plesant sour taste and the toast is out of this world. with a post script of it saying hey I'm healthy, but the taste is what you will remember.
Awesome! Good to hear it baked okay. The amazing thing about rye is it seems to be so much more predictable than wheat, which makes this bread in the "easy" end of sourdough endeavours, yet so rewarding in its brutally heavy flavour.
It should be possible to crack rye grains in a foodprocessor, I just dont know how happy the blades will be about it in the long run - dry grains are pretty hard. Whole grains does indeed take way longer to soak, and in addition the nutritional value of whole grains is non existant - enzymes and bacteria need access to the juicy insides to break the grain into something we can process. It just adds even more fibers to an already fiber heavy bread, not that thats a bad thing. Try soaking them for twice as long next time if you plan to go again :)
I have actually never tried toasting this bread... When I bake regularly in smaller tins, a bead usually lasts a week so they are still juicy and moist in the crumb even on day 7. One thing you can do though is to chop up old bread in very thin slices, and bake them at like 60-80 deg C until they are crispy but not burnt. Great snack.
Hi, it's my first post but not first bread from sourdough.com - first was Mathias Dahlgren's Swedish Rye Bread - with an apple twist.
My version of Scandinavian with very crispy crust - tae towel was too dry
Your recipe resembles the 'standard' bread that I bake very often, although I will add a small amount of wholewheat flour most of the times (300 gr rye for the sponge, 350 rye + 100 gr wheat flour added later.) I make a 'Brühstück' with oats (sometimes I use bulghur), sunflowerseeds, sesamseeds and/or linseed (together 150 gr + 150 ml boiling water). My son loves it especially when I only use sunflowerseed for Brühstück, because - as you said - the result is very juicy...
However, I turned towards a wheat starter a few years ago, because in my house it was rather difficult to keep a rye starter...
In the receipe it calls for adding 500g of Cracked rye Berries. Is this to non-milled rye berries are to be added????