
With the starter suitable refreshed after its little holiday in the back of the fridge and the last loaf dwindling at an alarming rate, it was back into the flour bin once more.
After theorising about the possibility that the source of heat from the fan contributed to the asymmetric rise and split of my last loaf, the main aim here was to change the heat source. So I went from the bread-baking setting back to the top/bottom heat which would be pure convection/radiant.

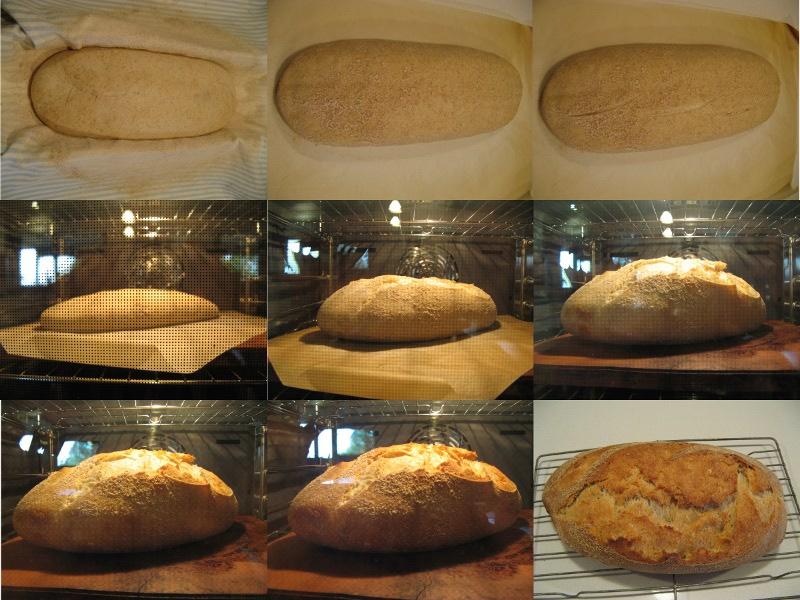
The sequence shows the shaped and proven dough, then in the oven at approximate ten minute intervals (sorry about the first one - the camera focussed on the door) and looking down on the finished product.
Unfortunately, I didn't get rid of the split but the oven spring is very uniform. Whilst the result can't be considered proof, I think perhaps that I was right about the heat distribution. Perhaps I will alternate the oven setting for the next few loaves to see if the effect can be reproduced.
Now, all I have to do is get rid of the splitting!
Replies
Splitting like that can also be a result of underproofing.
Cheers
Ross
Hi Ross
These are a bit approximate and give a run down on the whole procedure.
Prepped starter and pre-ferment about 4 hours (maybe five) based on timing from feeding sequence last post. Mixed dough (excl salt) and autolyse for 30 minutes. Added salt and three short kneads spread over 30 minutes. Rest one hour, stretch and fold, rest half hour, stretch and fold, rest half hour (getting a bit late at night by this stage). Shaped, into cloth lined basket, into placcy bag and into fridge 'til morning (about nine hours).
Out of fridge and on bench for maybe a couple of hours while I had breakfast, did the crossword, sudoku, ken ken,etc., ate fruit bread, drank tea, heated oven etc. A finger poke into the loaf rebounded slowly in my estimation so I reckoned proofing was OK. But still learning and welcome any suggestions/coaching from those more experienced.
Regards
Farinam
What's your current room temperature approximately, pls Farinam?
Sorry Ross, missed that bit of your first question. I didn't note it exactly but probably in the 19 to 20 C range.
Regards
Farinam
1. 4-5 hours is not enough time for a newly fed starter to hit peak ripeness if your ambient temp is around 20C. I'd push it out to 8 or so, but keep an eye on it. It is at its peak when it is at full dome.
2. Your bulk proof period appears to be 2 hours, including the initial 30 minutes of short kneads. In my experience, this is not enough with most formulae @ an ambient temp of 20C. Suggest experiment with increasing it to 3 hours+ before retarding in fridge overnight. Again, though, go by the dough appearance and feel, not time.
3. You could try cutting down on the amount of kneading you're doing. I don't do any - only hourly S&Fs, with more in warm temps (every 30 mins x 3) in which my BP is going to be reduced to 1.5 hours or so. In my experience, it's best to be gentle with the dough. However, I don't know what formulae you're using, so can't be sure that my experience will translate to your situation.
4. Sounds like you're making up for a reduced BP with a longer final proof. When I've finished my BP, shaped and retarded in fridge overnight, I usually bake straight out of the fridge next day. The overnight period in the fridge is enough of a final proof. However, this is only my preference. Karniecoops, for example, like you, completes the FP with a period at room temp after an overnight retardation, and her results are clearly excellent. I'd suggest try both. Extending your BP - if you decide to try this - is probably going to mean you can reduce your current FP outside the fridge to, say, 1 hour or 1.5 hours max. Again though, go on the dough, not the time.
There are lots of techniques and ways to go about turning out a great loaf. My suggestions are just that - suggestions. In my first year of SD bread baking, I tried lots of different recipes (and still do...just not as many), and various variations of process, before I arrived at something that suited me and yielded results I was (fairly) consistently happy with. I think it's good to experiment, but your call. If you do try any of the above, pls let us know how it went.
Cheers!
Ross
Will take your comments on board and keep experimenting. Fundamentally there is nothing wrong with the bread, just the aesthetics of the tear in the bread skin. The other thing that I might try some time is to add some water to the oven to try to keep the skin softer until the 'spring' is further advanced.
Will keep you informed.
Regards
Farinam
If the tear in the bread skin is symptomatic of underproofing (which is my bet), you'll find that the bread is not as good as it could be, even though there may seem to be nothing wrong with it other than aesthetically. Time - and experimentation - will tell...
I assumed you were using steam, but if not, doing so will make a significant difference to the quality of the crust.
I steam only for the first 12-15 minutes of the bake. If you keep the steam going the whole time it will detract from the crust rather than enhance it.
Also, I find the microwaved towel steaming method works a lot better than throwing a few icecubes in a heated tray in the bottom of the oven. Some folk bake their bread in a wrought iron camp oven or similar, with the lid on for the initial part of the bake. The idea is to use the steam coming off the dough. Others employ the same strategy by covering the bread with a stainless steel bowl or similar for the first 15 minutes or so, but I haven't tried that. Going by the pics posted by fabbo bakers like Shiao-Ping, this looks like a great steaming approach.
And others go to the trouble of heating a pile of laval rocks or nuts and bolts in a heavy tray in the bottom of the oven and throwing on water just before loading the dough. Too messy and too much potential for burning yourself for me, and frankly, I don't think it's necessary to go to these lengths unless you're baking baguettes or something else that really does need a lot of steam to bring the best out of them.
Enough rambling from me. You may or may not already be aware of all of the above...
Best of baking to you, Farinam!
Ross
I tried an experiment last weekend where I made two loaves and baked one under a metal bowl for the first 15 minutes, the other by spritzing with water on loading and every 4-5 minutes for 15 minutes, before finishing each bake on dry heat (and with no bowl for the first one). Both loaves formed exactly the same crust, but I didn't have to stand over the bowl-covered one. I do have to respritz with the no-bowl method as I bake in a fan-forced oven where I don't have the option of turning the fan off, and otherwise the steam just gets sucked out the vents too fast to do any good.
I initially tried a water-in-baking-tin-on-bottom-shelf steaming but that didn't work very well for me, probably due to the fan again. I haven't tried ice cubes and this is the first I've heard of the microwaved towel - can you describe that a bit more? I found the bowl method good, but I can only use it for loaves that fit under the bowl!
Hello Merrid
I have used the bowl method and it is good but for the problem of different shaped loaves. I saw somewhere that somebody had used some sort of 'tub' relating to paint rollers or something. I looked in the hardware and there is a fairly large metal receptacle of this sort available but at about $40-50 a bit more than you'd generally want to pay perhaps.
Recently I have been using the water in pie-dish method but with non-fan heating. Haven't had the really talkative crust that I have had in the past with the cloche method.
On the microwave towel method, Rossnroller might be more specific, but as I understand it, you wet a towel and zap it in the microwave to get the water nice and hot and steaming and then put that in the oven just before you put the bread in. I guess the towel just acts as a store of water to evaporate under its own steam (so to speak). Presumably, if it is wet enough, it doesn't dry out enough to burn.
As Ross intimates, when you pour the boiling water into the heated dish/tray, there is a certain amount of hissing and spitting goes on plus there is the action of putting the oven shelf back into place that could result in spillage if not done carefully.
Not sure that I've been much help.
Farinam
That's me. I might have been lucky, because Bunnings hardware had lots of the larger tubs and only one of the sort I bought - and it was only $7! Aside from being more expensive, the others are probably too large for my application.
This one is 34 x 21 x 13 cm, which suits my stone and oven. Here's a pic, which also shows the simple T-shaped tool I made to extract it from the oven when hot.
Hi Merrid.
Farinam has given you the basics of the towel method. I'll follow up with some specifics, but I've decided to put it up as a separate post so people searching for steaming methods can more easily find it. Link is here.
BTW, after experimenting with the convection fan on and off, I prefer to bake bread and pizza with the fan off, although it seems debate is ongoing among the home baking community as to which is better - depends on the sort of finish you like on your bread/pizza, I guess. Rotating the loaf 2-3 times per bake to keep the crust evenly coloured is necessary if the convection fan is off, and of course, baking temperatures and times have to be adjusted c/w fan on. Worth trying if you haven't already.
Cheers
Ross
Hahaha - "positively day-spa" - like that!
PS: SORRY MERRID - I have somehow managed to over-write your post! Now mine doesn't make sense. If you re-post, I'll get rid of it!
Well, I don't remember exactly what I wrote, but it was something along the lines of steamed towels are the kind of thing you find in a day spa treatment, aren't they? But for sure, your bread deserves the pampering!
Now I'll have to leave my overwritten comment up, since you've responded to it! Thanks a lot for locking me into preserving public evidence of my airheadedness...
Hi Farinam - I chuck about 4 ice cubes in a tray at the bottom of my oven just after I've slid my loaves in and I find this is far better than hot water (and less dangerous) - I haven't tried other techniques as this works just find for me. I also give my loaves a turn at about half time once in the oven. I find this helps remove any awkward shapes from hot/cold spots in the oven.
As for proofing - Ross's suggestions above are all good. I have baked straight from fridge after overnight proof, and sometimes leave the loaves at RT for a wee spell prior to slotting in the oven, it really depends on the type of loaf, the flours used and RT.
Maybe a little moisture in the oven will help stop the split - it certainly encourages a nice bit of oven spring and improves the crust.
That said, your loaves look fantastic - I love your time-lapse shots they're wonderful! My oven door is a bit too "soft focus/sepia" for that!
K.
Happiness is baking bread!
[quote=karniecoops]That said, your loaves look fantastic - I love your time-lapse shots they're wonderful! My oven door is a bit too "soft focus/sepia" for that!
[/quote]
Laughed aloud at your oven door comment, Karen! Mine's so 'soft focus-sepia' that it looks like it's still in the developing room!
BTW, I agree with you that icecubes tossed into a heated tray are better than boiling water in a tray. No race there. If you don't want to go to microwaving towels, icecubes are the deal. For SD bread, both methods are fine, though, in my experience. Suppose I just like to see evidence of steam when I open the oven door.
Cheers
Ross
Haha, I know what you mean about the door. Ours had the lovely rustic ruddy look too.
I gained some brownie points with my wife by cleaning the glass - it's not hard to do. I coated it with a slurry of baking soda (some say to add vinegar but it made no difference to me), left it for 20 minutes then gently scrubbed the gunk off. It's important not to use anything abrasive to avoid the risk of the glass shattering later, and also to protect the edges of the glass if it doesn't extend to the edge of the door; otherwise gloop can enter the door cavity.
Using ice cubes mystifies me - I tend to agree with Peter Reinhart: "Place the pan in the oven on a shelf either above or below the baking shelf and pour in hot water, not ice cubes; that’s old school and will cause the oven temperature to plummet." I find the tray method works really well for me, though I can imagine that different ovens might prefer different methods.