


I wanted to share what I've been doing lately, to achieve a decent sourdough loaf.
Okay, 'decent sourdough loaf' is a bit subjective, but hopefully, from the description, and the photos, one will be able to ascertain if this would be to their liking.
We like it, so I thought I'd share the steps I've taken.
**********
First, I must say that recently I was finally able to source some Rye flour. Organic rye :).
Here is how I'm feeding my starter lately:
1/2 c organic rye flour + 1/2 c very strong bread flour (white) + 3/4 c filtered water
Allow to sit on counter until happy - shove in the fridge (capped loosely).
**********
To make the dough - this is what I've been doing lately.
1 cup starter + 1/2 c wholemeal flour + 1/2 c very strong bread flour (white) + 3/4 c filtered water
I know. It sounds similar to what I do when I feed my starter. But the reason I do this is because I store my starter in the fridge and I do not feed it regularly. I know. Lazy. Or whatever. But this works for me. So bear with me.. :) And keep in mind that I bake three or four times per week, so this is probably why this works for me. The starter isn't neglected for that long between being fed.
So, in a glass bowl, I've got 1 c starter + 1/2 c wholemeal + 1/2 c very strong bread flour + 3/4 c filtered water. I gently give this a stir to combine - cover loosely with cling film and allow it get frothy and happy. Generally this takes a couple of hours in my kitchen. Incidentally, the ambient temperature in my kitchens runs between 20-24C these days. It will change in the Winter, no doubt.
After a couple of hours, I add:
6 cups very strong bread flour
1 1/4 c filtered water
1 heaped tablespoon (or so) honey
Form the dough in the bowl, using a scraper in my right hand while my left hand rotates the bowl. If the dough is too dry, I sometimes have to add about 1/8 c (more or less) filtered water. Once the dough is formed, I spray with a little olive oil - cover loosely with clingfilm - and place in the fridge overnight.
The next day (about 18-24 hours later), my dough is usually risen to almost double it's original size. I remove it from the fridge. Sometimes, it sits on the counter for a couple of hours before I do anything with it. And sometimes I work on it right away, depending on what's happening.
The steps I've been taking, from this point, are as follows:
Gently scrap dough from bowl, onto lightly floured granite surface.
Gently stretch dough and fold in thirds.
Allow to rest a few minutes.
Fold in thirds again. Rest. (sometimes 10 mins - sometimes a couple of hours -again, depending on when I need to cook)
Divide dough in half. Set one half aside.
For the first half, gently stretch dough and fold in thirds. Set aside.
Now gently stretch and fold other half - then set aside.
Taking first half back onto work surface - I now form whatever I'm making. Cover with tea towel and allow to prove.
If I'm making a round loaf (a couche?), then of course, I prepare a banneton with semolina - place the dough upside down and cover until about 80% proved. Then I turn the dough gently onto a slide/paddle sprinkled with semolina, and slash. I cover it lightly with a tea towel. With that ready and waiting to go in the oven, I put a small pan of water in my oven and wait about 5 minutes for it to heat up. (I use an Aga for cooking - see my previous blog - so my oven is always on, ready to cook).
If I'm making cinnamon rolls with half of the dough, then of course, I prepare those and allow to prove. See instructions for making my cinnamon rolls, below my round loaf photos.
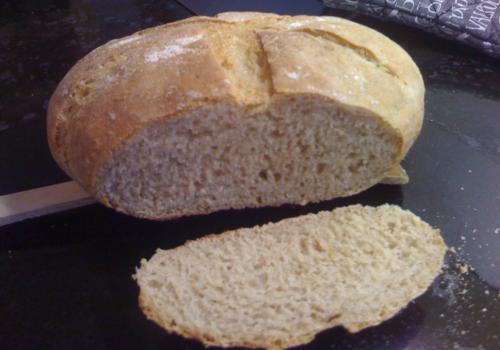
Here is one of the most recent loaves of Sourdough Bread using the above recipe and method:

This was one of the first loaves I was able to bake that had a decent spring in the oven - and where the slashes were able to work to good effect. The crust was nice and crunchy on the outside, had some chew to it (which my husband loves). Although it's not as thick as my husband prefers. Perhaps I can improve this somehow?

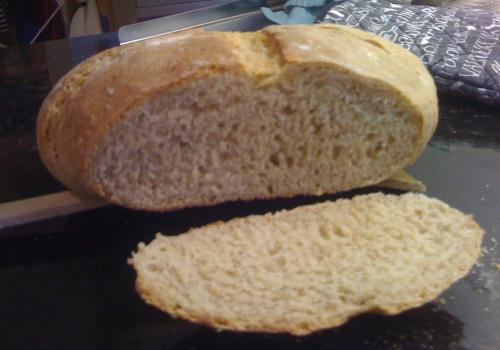
I say I allowed it to prove to about 80%, but the slash on the far left, in the above photo makes me wonder if I allowed it to go a little too far because it didn't quite expand like the rest of the loaf. Or perhaps I mishandled it when transferring from the banneton to the pizza paddle/slide?
That apple? Well, it's from our newly planted Bramley apple tree that we planted early this spring. We only allowed three or four apples to grow, to allow the tree to take root firmly.

Rotating the loaf, you can see how the slashes expanded nicely in some areas.
Those two jars, in the background, are my just-fed starters (I keep two jars going because I bake so much) ruminating in the ambient temperature of my kitchen before being relegated to the fridge.

The crumb is improving each time I bake. I suspect it's partly to do with the starter maturing somewhat. And perhaps partly to do with the folding technique? I wonder if I should do a further folding episode to increase the air?
Nevertheless, the bread has a rich, lovely flavour.
Someone suggested I put my dough in the fridge to allow it to ferment slowly and I believe this has had a tremendous impact on the wonderful flavour.

I wish I had a better focused shot of the crumb, but hopefully you get the idea. The crumb was moist with a firm structure at the same time and that lovely sourdough, signature flavour.
Okay. Cinnamon Rolls.
And I MUST apologise in advance that I don't have any photos of Cinnamon Rolls baked from Sourdough Starter. My family is ON them as soon as they are out of the oven and frosted! I will likely make some tomorrow (or the next day) and I promise I will add a new blog post dedicated to Cinnamon Rolls, including step by step photos.
What I actually do is take just under half the dough to make Cinnamon Rolls. This allows me to make a large Sourdough loaf of bread while the remaining dough is used for Cinnamon Rolls. Let's say the dough weighed 1000 grams (1 kg). I would take about 650-700 grams for the loaf - and the remaining dough would be for the Cinnamon Rolls - for those who need numbers. I'm not that kind of baker, yet - but I'm getting there:).
CINNAMON ROLL Recipe:
-Place dough on lightly floured surface and gently shape/stretch into a rough rectangle shape. It wil be fairly small at this point - and please do not handle roughly or you will lose all the air in the dough.
-With a dusted rolling pin, gently roll dough in all directions to enlarge the rectangle. Do this until the dough is between 1/2 inch and 1/4 inch thick. I don't like them too thick/doughy - I much prefer to have more layers once it's rolled up.
{Experiment, if you like - by halving the dough - and forming two rectangles. Roll one into a 1/2 inch thick rectangle and do the other into a 1/4 inch thick rectangle. Compare results after baking and see which you prefer most - because both will be good - but you'll definitely like one or the other better.}
-At this point, I prep two 9inch pans with approx. 1 tblsp of butter (melted).
tip: The time it takes me to finish prepping the dough allows the butter to cool enough so that it won't kill the yeast when I place the cut rolls into the pans.
-Melt about just under 1/2 cup of butter (or more if you prefer). Add approx. 5 heaped tblsps of soft brown sugar + 1 heaped tblsp of cinnamon. Combine and spread over dough with bendy/flexible spatula, making sure to spread to the outermost edges. Try not to spill onto work surface, but if you do - it's not the end of the world, as your dough scraper will come to the rescue later when rolling.
-Once the mixture is spread somewhat evenly over the dough, gently lift the far edges (farthest away from you) and begin to roll the dough (working from one side to the other) evenly toward you.
Roll snugly, but not too tightly.
I'm posting an OLD photo of an OLD batch of Cinnamon Rolls made with commercial yeast (to illustrate what I mean about rolling the dough toward you).

Note: You'll notice in this OLD photo (NOT using Sourdough Starter) that I added the filling slightly differently to what I'm recommending in my recipe. In this instance I poured on melted butter, sprinkled cinnamon and then added the sugar. I also did NOT put the ingredients close enough to the edges! If you prefer to put these ingredients on separately, that's fine - but just know, as I've discovered, that the end result will vary depending on how you do it. I guess it's kind of like chemistry in a way. And that is okay - you can experiment with various methods of applying the filling and see what you prefer. I happen to prefer the end result of mixing all the ingredients and spreading it on the dough together (less messy and nicest end result, in my opinion).
-STOP rolling once you have about two or three inches left on the counter (nearest you)!
Below photo illustrates what I mean by leaving about two-three inches:

-At this point, lift the dough edges (nearest you) - and you may need the help of the dough-scraper to lift it, begin to gently fold over (away from you) onto the top of the roll working your way from one end of the roll to the other. Pinch gently as you go, to seal the dough and keep the roll snugly together.
-Sometimes you may have to gently tug the dough 'corners' to make sure it evenly covers the ends of the log. I don't know about you, but I want the end pieces of the log to yield nice rolls - not yucky end pieces! Try not to tear the dough, in the process.
-Once the dough is neatly rolled into a 'log', take a sharp knife - and cut the log in half. Remember, we're working on the basis of filling two pans. So, each half-log will designated for it's own pan.
Here is where it can get sticky for beginners. Just have a little think about it for a second before you charge ahead and cut them too small to fill a pan, or too large....
I usually aim for 6 rolls per (9inch round) pan - one in the middle - 5 circling the centre roll. I tend to cut the half-log in half - then the remaining halves into three pieces each. This leaves me with six rolls for a pan. However, just keep in mind that the rolls need to be cut into at least two inch wide pieces (which translates to 2 inches 'tall' when you stand them on end in the pan) or they will not yield the nicest result.
With all that in mind?
-Proceed to cut the half-logs into approx 2+ inch thick pieces.
I'll just go ahead and post a photo of the freshly cut pieces in the pan to help give an idea for beginners:

Here is one more, of the whole batch (remember - old photo - NOT Sourdough) which are in the process of proving on my Aga cooker.

Notice the pans to the left? Those were the first of the rolls cut and placed on the Aga. followed by the other pans which had not begun rising yet.
You might notice in the previous photos (above) that the dough is rolled about 1/2 thick. And in the photo immediately above, you can see how thick the dough is when rising. Remember, this is from an old recipe - for illustrative purposes. If you like cinnamon rolls that are very bready with a hint of filling, then 2 inches thick is perfect.
If, however, you prefer more cinnamony-surgary-buttery yumminess like me, then rolling the dough slightly thinner will yield a bready but ooey gooey buttery cinnamon roll that beckons you to eat far more than you should.
One last comment, because I'm pedantic about some things: The reason there are so many pans proving on the Aga in this photo is because that particular recipe yields 9 pans of cinnamon rolls.
It is a fabulous recipe - one found after many years of searching for the perfect Cinnamon Roll recipe. It has never failed me and yields the most amazing Cinnamon Rolls. But, it uses commercial yeast.
The Sourdough Cinnamon rolls are very good, but not quite as good (texturally) as my old recipe. I plan to adopt that old recipe using Sourdough Starter, but haven't quite worked out the kinks just yet. When I do - I will make yet another blog post about it, because that is one awesome recipe.....
Replies
......... cinnamon rolls look heavenly! A friend bought me a cinnamon roll from a cafe a while ago and it was so yummy we just kind of stared at each other while we ate them! These look like that kind of roll! Crikey I can hear my elastic waisted leisure pants calling me! Thanks Lisa
K.
Happiness is making bread.
Thanks karniecoops.
And. I almost choked laughing when I read the elastic waisted leisure pants part.
Wait until I get the recipe tweaked with Sourdough Starter. I imagine it will be even better than the original recipe. I actually had to stop making those rolls for a while so I could fit back into trousers - you know - with a zip and a button.
Your loaf looks really nice Lisa, so do your cinnamon rolls. I'm with Karniecoops on the elastic pants, if I keep baking like this that's where I'll be heading!!
Love your Bread! And your rolls too! I have found a baker who neglects feeding her starter on a regular
basis. Me too! Thanks for posting your bread recipe. Will give it a try sometime soon. Found your
cinnamon roll thread first, so had to back track to this one for the recipe. Better go feed my starter!